<?xml version="1.0" encoding="utf-8"?><feed xmlns="http://www.w3.org/2005/Atom" ><generator uri="https://jekyllrb.com/" version="4.4.1">Jekyll</generator><link href="https://fabianborn.net/feed.xml" rel="self" type="application/atom+xml" /><link href="https://fabianborn.net/" rel="alternate" type="text/html" /><updated>2026-09-18T14:53:06+00:00</updated><id>https://fabianborn.net/feed.xml</id><title type="html">Fabian Born</title><subtitle>Cloud Solutions Architect writing about Kubernetes, AWS, NetApp storage, automation and homelab projects.</subtitle><author><name>Fabian Born</name><email>blog@fabianborn.net</email></author><entry><title type="html">Agentic AI in Practice</title><link href="https://fabianborn.net/2026/07/agentic-ai-in-practice/" rel="alternate" type="text/html" title="Agentic AI in Practice" /><published>2026-07-16T00:00:00+00:00</published><updated>2026-07-16T00:00:00+00:00</updated><id>https://fabianborn.net/2026/07/agentic-ai-in-practice</id><content type="html" xml:base="https://fabianborn.net/2026/07/agentic-ai-in-practice/"><![CDATA[<h4 id="agentic-ai-in-practice">Agentic AI in Practice</h4>

<h4 id="from-knowledge-retrieval-to-an-autonomous-agent-with-fsxn">From Knowledge Retrieval to an Autonomous Agent with FSxN</h4>

<p><img src="/assets/images/posts/agentic-ai-in-practice/IMG_9032-1024x741.png" alt="" /></p>

<h4 id="recap--starting-point">Recap &amp; Starting Point</h4>

<p>Part 1 of this series showed why agentic AI confronts public cloud infrastructure with three central challenges: identity &amp; governance for non-human identities, real-time data pipelines, and scalable model serving. This second part gets concrete: we build on the existing enterprise knowledge base architecture with Amazon Bedrock and FSxN and extend it with an agentic action layer.</p>

<p>The earlier knowledge base article describes a classic RAG system: the user asks a question, the system searches the FSxN-backed knowledge base via S3 Access Points, and returns an answer. That works well for simple queries — but it reaches its limits as soon as multi-step tasks requiring independent decisions come into play.</p>

<h4 id="from-rag-system-to-agent--what-changes">From RAG System to Agent — What Changes</h4>

<p>A pure RAG system follows a fixed pattern: retrieval, then answer. An agent, by contrast, can decide for itself whether and how often to query the knowledge base, whether it considers the result sufficient or needs to follow up specifically, and whether a further action is required — such as updating a ticket or triggering a downstream process.</p>

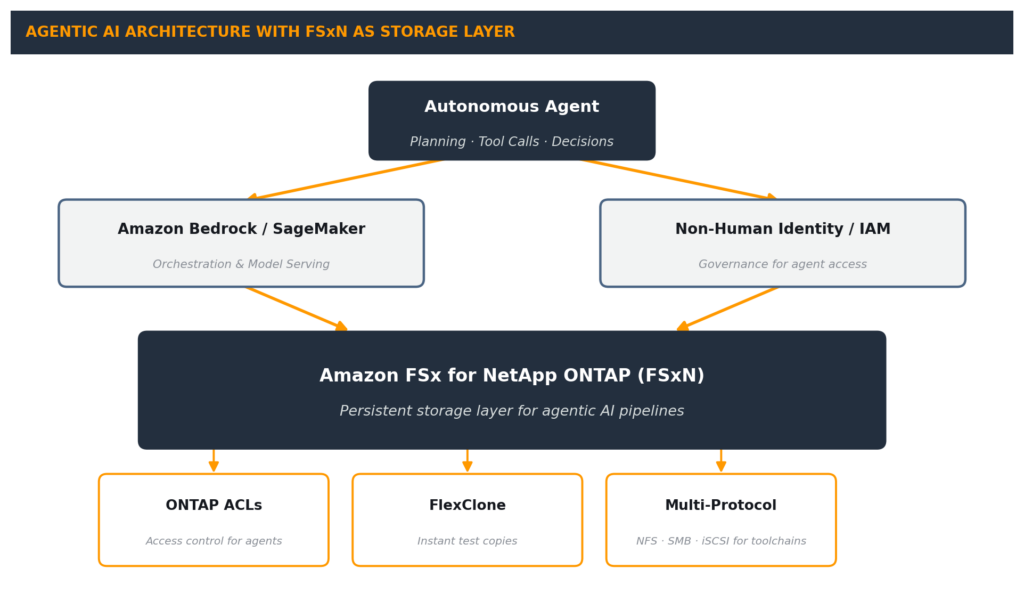
<p>Technically, this capability is realized through Action Groups in Amazon Bedrock Agents: the agent gets access to defined functions (tools) that it calls independently as part of its planning. In our case, one of these functions is the existing FSxN-backed knowledge base — complemented by a Lambda function that acts as a broker between the agent and the data layer, enforcing the access controls already established there.</p>

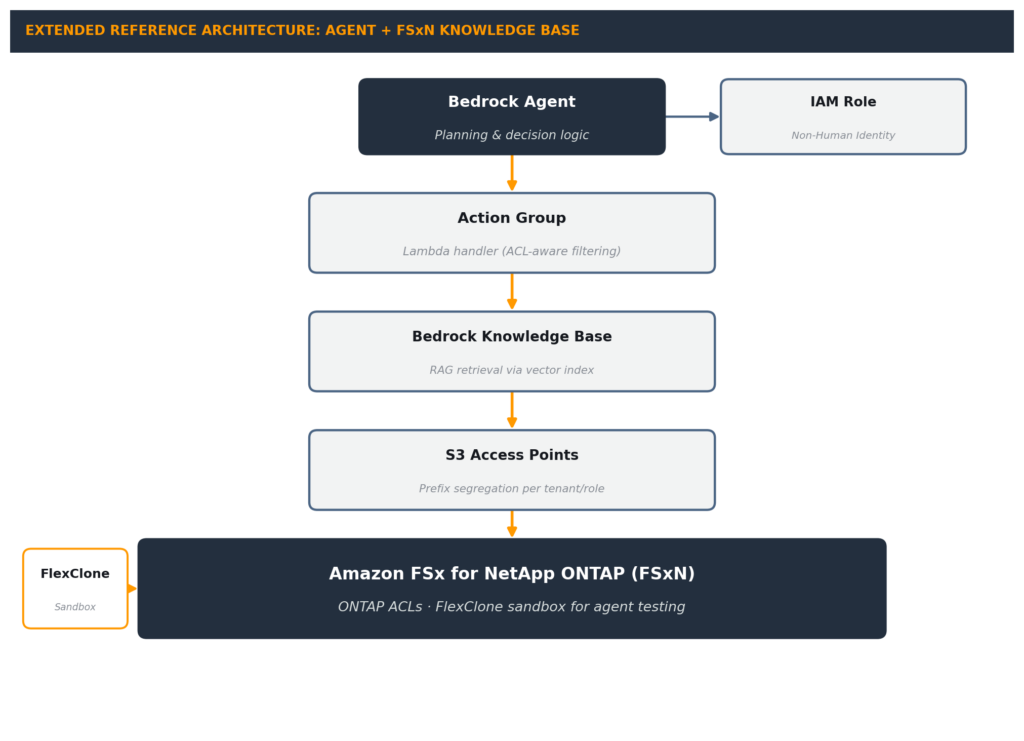
<h4 id="extended-reference-architecture">Extended Reference Architecture</h4>

<p>The following architecture builds directly on the familiar knowledge base structure and adds two new layers: the Bedrock Agent with Action Group as the orchestration layer, and an IAM role that anchors the agent as an independent, restricted identity within the system.</p>

<p>Additionally, a FlexClone sandbox appears in the architecture: before a new version of the agent or Lambda handler goes into production, FlexClone can create an isolated copy of the knowledge base in seconds, against which test runs take place — with no risk to production data.</p>

<h4 id="three-concrete-building-blocks">Three Concrete Building Blocks</h4>

<h5 id="example-1-iam-role-for-the-agent-identity">Example 1: IAM Role for the Agent Identity</h5>

<p>The agent needs its own tightly scoped IAM role. The following policy grants access exclusively to the relevant S3 Access Point and model invocation — nothing more:</p>

<div class="language-json highlighter-rouge"><div class="highlight"><pre class="highlight"><code><span class="p">{</span><span class="w">
  </span><span class="nl">"Version"</span><span class="p">:</span><span class="w"> </span><span class="s2">"2012-10-17"</span><span class="p">,</span><span class="w">
  </span><span class="nl">"Statement"</span><span class="p">:</span><span class="w"> </span><span class="p">[</span><span class="w">
    </span><span class="p">{</span><span class="w">
      </span><span class="nl">"Sid"</span><span class="p">:</span><span class="w"> </span><span class="s2">"AllowKnowledgeBaseAccessPoint"</span><span class="p">,</span><span class="w">
      </span><span class="nl">"Effect"</span><span class="p">:</span><span class="w"> </span><span class="s2">"Allow"</span><span class="p">,</span><span class="w">
      </span><span class="nl">"Action"</span><span class="p">:</span><span class="w"> </span><span class="p">[</span><span class="w">
        </span><span class="s2">"s3:GetObject"</span><span class="p">,</span><span class="w">
        </span><span class="s2">"s3:ListBucket"</span><span class="w">
      </span><span class="p">],</span><span class="w">
      </span><span class="nl">"Resource"</span><span class="p">:</span><span class="w"> </span><span class="p">[</span><span class="w">
        </span><span class="s2">"arn:aws:s3:us-east-1:111122223333:accesspoint/agent-kb-ap"</span><span class="p">,</span><span class="w">
        </span><span class="s2">"arn:aws:s3:us-east-1:111122223333:accesspoint/agent-kb-ap/object/*"</span><span class="w">
      </span><span class="p">]</span><span class="w">
    </span><span class="p">},</span><span class="w">
    </span><span class="p">{</span><span class="w">
      </span><span class="nl">"Sid"</span><span class="p">:</span><span class="w"> </span><span class="s2">"AllowBedrockAgentRuntime"</span><span class="p">,</span><span class="w">
      </span><span class="nl">"Effect"</span><span class="p">:</span><span class="w"> </span><span class="s2">"Allow"</span><span class="p">,</span><span class="w">
      </span><span class="nl">"Action"</span><span class="p">:</span><span class="w"> </span><span class="p">[</span><span class="w">
        </span><span class="s2">"bedrock:InvokeModel"</span><span class="p">,</span><span class="w">
        </span><span class="s2">"bedrock:Retrieve"</span><span class="w">
      </span><span class="p">],</span><span class="w">
      </span><span class="nl">"Resource"</span><span class="p">:</span><span class="w"> </span><span class="s2">"arn:aws:bedrock:us-east-1:111122223333:knowledge-base/KB123ABC"</span><span class="w">
    </span><span class="p">},</span><span class="w">
    </span><span class="p">{</span><span class="w">
      </span><span class="nl">"Sid"</span><span class="p">:</span><span class="w"> </span><span class="s2">"AllowLambdaInvocation"</span><span class="p">,</span><span class="w">
      </span><span class="nl">"Effect"</span><span class="p">:</span><span class="w"> </span><span class="s2">"Allow"</span><span class="p">,</span><span class="w">
      </span><span class="nl">"Action"</span><span class="p">:</span><span class="w"> </span><span class="s2">"lambda:InvokeFunction"</span><span class="p">,</span><span class="w">
      </span><span class="nl">"Resource"</span><span class="p">:</span><span class="w"> </span><span class="s2">"arn:aws:lambda:us-east-1:111122223333:function:agent-kb-handler"</span><span class="w">
    </span><span class="p">}</span><span class="w">
  </span><span class="p">]</span><span class="w">
</span><span class="p">}</span><span class="w">
</span></code></pre></div></div>

<p>What matters most here is the combination of resource-specific ARNs instead of wildcards: the agent can access only the access point and knowledge base intended for it — exactly the least-privilege principle described as a governance requirement in Part 1.</p>

<h5 id="example-2-lambda-handler-with-acl-aware-filtering">Example 2: Lambda Handler with ACL-Aware Filtering</h5>

<p>The agent’s Action Group calls a Lambda function that forwards the request to the knowledge base while also taking into account the permissions of the original requester — not just those of the agent itself. This preserves the multi-layer access control already established in the knowledge base article, even in the agentic context:</p>

<div class="language-python highlighter-rouge"><div class="highlight"><pre class="highlight"><code><span class="kn">import</span> <span class="n">boto3</span>

<span class="n">bedrock_agent_runtime</span> <span class="o">=</span> <span class="n">boto3</span><span class="p">.</span><span class="nf">client</span><span class="p">(</span><span class="sh">"</span><span class="s">bedrock-agent-runtime</span><span class="sh">"</span><span class="p">)</span>

<span class="k">def</span> <span class="nf">lambda_handler</span><span class="p">(</span><span class="n">event</span><span class="p">,</span> <span class="n">context</span><span class="p">):</span>
    <span class="n">query</span> <span class="o">=</span> <span class="n">event</span><span class="p">[</span><span class="sh">"</span><span class="s">inputText</span><span class="sh">"</span><span class="p">]</span>
    <span class="n">requester_group</span> <span class="o">=</span> <span class="n">event</span><span class="p">[</span><span class="sh">"</span><span class="s">sessionAttributes</span><span class="sh">"</span><span class="p">].</span><span class="nf">get</span><span class="p">(</span><span class="sh">"</span><span class="s">userGroup</span><span class="sh">"</span><span class="p">)</span>

    <span class="n">response</span> <span class="o">=</span> <span class="n">bedrock_agent_runtime</span><span class="p">.</span><span class="nf">retrieve</span><span class="p">(</span>
        <span class="n">knowledgeBaseId</span><span class="o">=</span><span class="sh">"</span><span class="s">KB123ABC</span><span class="sh">"</span><span class="p">,</span>
        <span class="n">retrievalQuery</span><span class="o">=</span><span class="p">{</span><span class="sh">"</span><span class="s">text</span><span class="sh">"</span><span class="p">:</span> <span class="n">query</span><span class="p">},</span>
        <span class="n">retrievalConfiguration</span><span class="o">=</span><span class="p">{</span>
            <span class="sh">"</span><span class="s">vectorSearchConfiguration</span><span class="sh">"</span><span class="p">:</span> <span class="p">{</span>
                <span class="sh">"</span><span class="s">numberOfResults</span><span class="sh">"</span><span class="p">:</span> <span class="mi">5</span><span class="p">,</span>
                <span class="sh">"</span><span class="s">filter</span><span class="sh">"</span><span class="p">:</span> <span class="p">{</span>
                    <span class="sh">"</span><span class="s">equals</span><span class="sh">"</span><span class="p">:</span> <span class="p">{</span>
                        <span class="sh">"</span><span class="s">key</span><span class="sh">"</span><span class="p">:</span> <span class="sh">"</span><span class="s">acl_group</span><span class="sh">"</span><span class="p">,</span>
                        <span class="sh">"</span><span class="s">value</span><span class="sh">"</span><span class="p">:</span> <span class="n">requester_group</span>
                    <span class="p">}</span>
                <span class="p">}</span>
            <span class="p">}</span>
        <span class="p">},</span>
    <span class="p">)</span>

    <span class="n">results</span> <span class="o">=</span> <span class="n">response</span><span class="p">.</span><span class="nf">get</span><span class="p">(</span><span class="sh">"</span><span class="s">retrievalResults</span><span class="sh">"</span><span class="p">,</span> <span class="p">[])</span>
    <span class="n">context_text</span> <span class="o">=</span> <span class="sh">"</span><span class="s">n</span><span class="sh">"</span><span class="p">.</span><span class="nf">join</span><span class="p">(</span><span class="n">r</span><span class="p">[</span><span class="sh">"</span><span class="s">content</span><span class="sh">"</span><span class="p">][</span><span class="sh">"</span><span class="s">text</span><span class="sh">"</span><span class="p">]</span> <span class="k">for</span> <span class="n">r</span> <span class="ow">in</span> <span class="n">results</span><span class="p">)</span>

    <span class="k">return</span> <span class="p">{</span>
        <span class="sh">"</span><span class="s">messageVersion</span><span class="sh">"</span><span class="p">:</span> <span class="sh">"</span><span class="s">1.0</span><span class="sh">"</span><span class="p">,</span>
        <span class="sh">"</span><span class="s">response</span><span class="sh">"</span><span class="p">:</span> <span class="p">{</span>
            <span class="sh">"</span><span class="s">actionResponse</span><span class="sh">"</span><span class="p">:</span> <span class="p">{</span>
                <span class="sh">"</span><span class="s">actionResponseBody</span><span class="sh">"</span><span class="p">:</span> <span class="p">{</span>
                    <span class="sh">"</span><span class="s">TEXT</span><span class="sh">"</span><span class="p">:</span> <span class="p">{</span><span class="sh">"</span><span class="s">body</span><span class="sh">"</span><span class="p">:</span> <span class="n">context_text</span><span class="p">}</span>
                <span class="p">}</span>
            <span class="p">}</span>
        <span class="p">},</span>
    <span class="p">}</span>
</code></pre></div></div>

<p>The key point is the <code class="language-plaintext highlighter-rouge">acl_group</code> metadata filter: it ensures that the agent, acting on behalf of the user, only accesses documents authorized for that user’s permission group — the metadata filtering from the original knowledge base article is carried over one-to-one into the agent architecture, rather than being bypassed by the agent’s autonomy.</p>

<h5 id="example-3-flexclone-automation-for-agent-testing">Example 3: FlexClone Automation for Agent Testing</h5>

<p>Before every test run of a new agent or handler version, a FlexClone snapshot of production data can be created automatically via boto3. The following script shows the core workflow for an FSxN volume:</p>

<div class="language-python highlighter-rouge"><div class="highlight"><pre class="highlight"><code><span class="kn">import</span> <span class="n">boto3</span>
<span class="kn">import</span> <span class="n">time</span>

<span class="n">fsx</span> <span class="o">=</span> <span class="n">boto3</span><span class="p">.</span><span class="nf">client</span><span class="p">(</span><span class="sh">"</span><span class="s">fsx</span><span class="sh">"</span><span class="p">)</span>

<span class="k">def</span> <span class="nf">create_test_clone</span><span class="p">(</span><span class="n">source_volume_id</span><span class="p">:</span> <span class="nb">str</span><span class="p">,</span> <span class="n">clone_name</span><span class="p">:</span> <span class="nb">str</span><span class="p">)</span> <span class="o">-&gt;</span> <span class="nb">str</span><span class="p">:</span>
    <span class="n">response</span> <span class="o">=</span> <span class="n">fsx</span><span class="p">.</span><span class="nf">create_volume</span><span class="p">(</span>
        <span class="n">VolumeType</span><span class="o">=</span><span class="sh">"</span><span class="s">ONTAP</span><span class="sh">"</span><span class="p">,</span>
        <span class="n">Name</span><span class="o">=</span><span class="n">clone_name</span><span class="p">,</span>
        <span class="n">OntapConfiguration</span><span class="o">=</span><span class="p">{</span>
            <span class="sh">"</span><span class="s">StorageVirtualMachineId</span><span class="sh">"</span><span class="p">:</span> <span class="sh">"</span><span class="s">svm-0123456789abcdef0</span><span class="sh">"</span><span class="p">,</span>
            <span class="sh">"</span><span class="s">JunctionPath</span><span class="sh">"</span><span class="p">:</span> <span class="sa">f</span><span class="sh">"</span><span class="s">/</span><span class="si">{</span><span class="n">clone_name</span><span class="si">}</span><span class="sh">"</span><span class="p">,</span>
            <span class="sh">"</span><span class="s">SizeInMegabytes</span><span class="sh">"</span><span class="p">:</span> <span class="mi">102400</span><span class="p">,</span>
            <span class="sh">"</span><span class="s">OntapVolumeType</span><span class="sh">"</span><span class="p">:</span> <span class="sh">"</span><span class="s">RW</span><span class="sh">"</span><span class="p">,</span>
            <span class="sh">"</span><span class="s">SnapshotPolicy</span><span class="sh">"</span><span class="p">:</span> <span class="sh">"</span><span class="s">none</span><span class="sh">"</span><span class="p">,</span>
            <span class="sh">"</span><span class="s">CopyTagsToBackups</span><span class="sh">"</span><span class="p">:</span> <span class="bp">False</span><span class="p">,</span>
            <span class="c1"># FlexClone: the new volume references the source volume efficiently
</span>            <span class="sh">"</span><span class="s">ClonedVolumeSource</span><span class="sh">"</span><span class="p">:</span> <span class="p">{</span>
                <span class="sh">"</span><span class="s">VolumeId</span><span class="sh">"</span><span class="p">:</span> <span class="n">source_volume_id</span><span class="p">,</span>
                <span class="sh">"</span><span class="s">SnapshotId</span><span class="sh">"</span><span class="p">:</span> <span class="sh">"</span><span class="s">latest</span><span class="sh">"</span>
            <span class="p">},</span>
        <span class="p">},</span>
    <span class="p">)</span>
    <span class="n">volume_id</span> <span class="o">=</span> <span class="n">response</span><span class="p">[</span><span class="sh">"</span><span class="s">Volume</span><span class="sh">"</span><span class="p">][</span><span class="sh">"</span><span class="s">VolumeId</span><span class="sh">"</span><span class="p">]</span>

    <span class="k">while</span> <span class="bp">True</span><span class="p">:</span>
        <span class="n">status</span> <span class="o">=</span> <span class="n">fsx</span><span class="p">.</span><span class="nf">describe_volumes</span><span class="p">(</span><span class="n">VolumeIds</span><span class="o">=</span><span class="p">[</span><span class="n">volume_id</span><span class="p">])</span>
        <span class="n">lifecycle</span> <span class="o">=</span> <span class="n">status</span><span class="p">[</span><span class="sh">"</span><span class="s">Volumes</span><span class="sh">"</span><span class="p">][</span><span class="mi">0</span><span class="p">][</span><span class="sh">"</span><span class="s">Lifecycle</span><span class="sh">"</span><span class="p">]</span>
        <span class="k">if</span> <span class="n">lifecycle</span> <span class="o">==</span> <span class="sh">"</span><span class="s">AVAILABLE</span><span class="sh">"</span><span class="p">:</span>
            <span class="k">break</span>
        <span class="n">time</span><span class="p">.</span><span class="nf">sleep</span><span class="p">(</span><span class="mi">5</span><span class="p">)</span>

    <span class="k">return</span> <span class="n">volume_id</span>

<span class="c1"># Example: create an isolated test copy for the next CI run
</span><span class="n">test_volume</span> <span class="o">=</span> <span class="nf">create_test_clone</span><span class="p">(</span>
    <span class="n">source_volume_id</span><span class="o">=</span><span class="sh">"</span><span class="s">fsvol-0abc123def456789</span><span class="sh">"</span><span class="p">,</span>
    <span class="n">clone_name</span><span class="o">=</span><span class="sh">"</span><span class="s">agent-test-run-482</span><span class="sh">"</span><span class="p">,</span>
<span class="p">)</span>
<span class="nf">print</span><span class="p">(</span><span class="sa">f</span><span class="sh">"</span><span class="s">Sandbox volume ready: </span><span class="si">{</span><span class="n">test_volume</span><span class="si">}</span><span class="sh">"</span><span class="p">)</span>
</code></pre></div></div>

<p>This script can be hooked directly into a CI/CD pipeline: before every automated test run, a fresh, isolated copy of production data is created in seconds rather than minutes or hours — without consuming the storage footprint of a full copy operation.</p>

<h4 id="governance-in-practice">Governance in Practice</h4>

<p>The three examples map directly back to the requirements described in Part 1:</p>

<table>
  <thead>
    <tr>
      <th>Requirement from Part 1</th>
      <th>Concrete implementation in Part 2</th>
    </tr>
  </thead>
  <tbody>
    <tr>
      <td>Identity &amp; governance for non-human identities</td>
      <td>Least-privilege IAM role (Example 1); Lambda handler enforces ACL filtering per request</td>
    </tr>
    <tr>
      <td>Real-time data pipelines &amp; vector databases</td>
      <td>Bedrock Knowledge Base + S3 Access Points as the existing RAG pipeline, now driven agentically</td>
    </tr>
    <tr>
      <td>Scalable model-serving infrastructure</td>
      <td>Action Group architecture separates orchestration (agent) from retrieval (knowledge base) for independent scaling</td>
    </tr>
  </tbody>
</table>

<blockquote>
  <p>The key difference from Part 1: governance is no longer an abstract principle here, but concretely traceable in policy documents, filtering logic, and automation scripts.</p>
</blockquote>

<h4 id="pitfalls--lessons-learned">Pitfalls &amp; Lessons Learned</h4>

<p>In practice, three recurring challenges emerge. First: latency from nested tool calls. Every additional step the agent introduces adds to the overall response time — for interactive use cases, it’s worth deliberately limiting the number of Action Group calls per request.</p>

<p>Second: snapshot freshness versus test consistency. If the FlexClone is refreshed too rarely, tests run against stale data; if refreshed too often, compute and coordination overhead rises. A daily refresh cycle has proven to be a good compromise in most scenarios.</p>

<p>Third: test automation moves from nice-to-have to mandatory. Since the agent acts autonomously, its behavior can no longer be safeguarded through manual spot checks alone — automated test runs against the FlexClone sandbox are the only practical way to reliably catch regressions before they reach production.</p>

<h4 id="conclusion--outlook">Conclusion &amp; Outlook</h4>

<p>Extending the existing knowledge base architecture with an agentic action layer shows that the three requirements from Part 1 don’t have to remain abstract concepts: least-privilege IAM roles, ACL-aware retrieval logic, and FlexClone-backed test automation can be implemented in production with comparatively little additional code.</p>

<p>An obvious next step for a potential third part would be observability: how do you keep track of which decisions an agent makes in production, which tools it calls and how often, and where costs or latency start to run away? That would round out the series — from architecture, through implementation, to operations.</p>]]></content><author><name>Fabian Born</name><email>blog@fabianborn.net</email></author><category term="AI" /><category term="howto" /><category term="Agentic AI" /><category term="AI" /><category term="AWS" /><category term="Cloud" /><category term="FSxN" /><category term="NetApp" /><summary type="html"><![CDATA[Agentic AI in Practice From Knowledge Retrieval to an Autonomous Agent with FSxN […]]]></summary></entry><entry><title type="html">Agentic AI as an Infrastructure Driver</title><link href="https://fabianborn.net/2026/07/agentic-ai-as-an-infrastructure-driver/" rel="alternate" type="text/html" title="Agentic AI as an Infrastructure Driver" /><published>2026-07-10T00:00:00+00:00</published><updated>2026-07-10T00:00:00+00:00</updated><id>https://fabianborn.net/2026/07/agentic-ai-as-an-infrastructure-driver</id><content type="html" xml:base="https://fabianborn.net/2026/07/agentic-ai-as-an-infrastructure-driver/"><![CDATA[<h2 id="agentic-ai-as-an-infrastructure-driver">Agentic AI as an Infrastructure Driver</h2>
<h4 id="what-autonomous-agents-demand-from-the-public-cloud">What Autonomous Agents Demand from the Public Cloud</h4>

<p><img src="/assets/images/posts/agentic-ai-as-an-infrastructure-driver/IMG_0129-1024x609.png" alt="" /></p>

<h4 id="from-chatbot-to-autonomous-agent">From Chatbot to Autonomous Agent</h4>

<p>2026 marks a turning point for the public cloud market: AI systems are evolving from reactive chatbots into autonomous agents that independently plan tasks, call tools, and make decisions across multiple steps. According to IDC, more than 50% of enterprises will deploy AI agents to steer core business processes by 2027 – no longer as an experiment, but as a productive part of value creation.</p>

<p>At the same time, AI’s share of overall cloud spending is rising rapidly: analysts expect AI-related cloud spending to already account for nearly 20% of total cloud spend in 2026, up from around 8% just three years ago. A growing portion of this investment is no longer flowing into classic model inference, but into the infrastructure surrounding autonomous agents – that is, into orchestration, data connectivity, and governance.</p>

<p>This shift is more than a new feature at the application layer. It fundamentally changes the demands placed on the underlying cloud infrastructure – and that’s exactly where this post picks up. While public discussion tends to focus on model capabilities and agent frameworks, in practice it’s often the underlying infrastructure that determines whether an agentic AI project makes the leap from pilot phase to production.</p>

<h4 id="what-makes-agentic-ai-infrastructurally-different">What Makes Agentic AI Infrastructurally Different</h4>

<p>Classic generative AI applications follow a simple pattern: request in, response out. Agentic AI systems break with this pattern. An agent plans a task, calls multiple tools and data sources in sequence, evaluates intermediate results, and makes further decisions on that basis – often fully autonomously and over minutes or hours, sometimes as an interplay between several specialized agents.</p>

<p>For infrastructure, this brings several shifts at once: load profiles change from short, bursty requests to continuous, long-running inference pipelines. Classic auto-scaling, designed for short-term load spikes, falls short here – what’s needed instead are architectures that can efficiently sustain persistently high but variable baseline load.</p>

<p>At the same time, the number of systems that access data and services independently is increasing. Agents increasingly act like independent, non-human identities within the corporate network — with their own permissions, their own access patterns, and their own risk profile. This combination of new load profiles and new identity types is at the core of what makes agentic AI infrastructurally its own category.</p>

<h4 id="three-critical-infrastructure-requirements">Three Critical Infrastructure Requirements</h4>

<p><strong>1. Identity &amp; Governance for Non-Human Identities</strong><br />
 Agents, bots, and machine accounts are becoming the new primary risk surface. According to recent surveys among security leaders, AI agents create faster and harder-to-detect attack surfaces than classic automation – and most organizations still lack a mature governance model for these non-human identities. Without a granular permission model, hard-to-trace access patterns become likely; governance thus becomes a prerequisite for the productive use of agentic AI.</p>

<p><strong>2. Real-Time Data Pipelines &amp; Vector Databases</strong><br />
 Agents need continuous, low-latency access to current enterprise data – frequently via vector databases for retrieval-augmented generation, as well as feature stores for structured data. Storage performance and data consistency thus become the limiting factor for the quality and reliability of agent decisions: an agent can only plan as well as the data it accesses is current and accessible.</p>

<p><strong>3. Scalable Model-Serving Infrastructure</strong><br />
Inference routers, gateways, and autoscaling layers must handle heavily fluctuating, but generally rising, load. Because agents frequently trigger multiple model calls per task, latencies add up along the entire chain. Reproducible infrastructure, automated via infrastructure-as-code, thus becomes essential to operating agentic AI workloads reliably and cost-effectively.</p>

<h4 id="why-this-is-an-fsxn-topic">Why This Is an FSxN Topic</h4>

<p>Amazon FSx for NetApp ONTAP (FSxN) addresses central challenges of agentic AI architectures at exactly these three points. In a typical scenario, an agent – via Amazon Bedrock or SageMaker, for example – orchestrates multiple knowledge and data sources to complete a task independently. FSxN takes on the role of the persistent, business-critical storage layer behind this orchestration, while the actual agent logic runs within the AI services.</p>

<p>Specifically, the value shows up in three places. First, native ONTAP ACLs enable granular, file-based access control for non-human identities: an agent receives exactly the permissions it needs for its specific task – no more – and access is traceably logged. This directly addresses the governance gap that often arises with purely application-side permission models.</p>

<p>Second, FlexClone allows isolated, space-efficient copies of production data to be created in seconds for agent testing and validation, without touching the live environment or consuming significant additional storage. Because agents act autonomously, the ability to test their behavior beforehand against realistic but isolated data copies is an essential building block for safe production operation.</p>

<p>Third, FSxN’s multi-protocol capability (NFS, SMB, iSCSI) ensures that heterogeneous agent toolchains – from Python-based frameworks to containerized microservices on EKS via Trident CSI – access the same consistent data foundation without having to duplicate or synchronize data. For RAG-based agentic pipelines, this means FSxN delivers not only the storage performance needed for vector databases and knowledge bases, but also the governance and snapshot mechanisms that meet enterprise requirements for traceability and testability.</p>

<blockquote>
  <p><strong>In short:</strong> FSxN evolves from classic enterprise storage into an active building block of agentic AI governance – wherever performance, access control, and testability need to come together.</p>
</blockquote>

<h4 id="conclusion-infrastructure-is-necessary-but-not-sufficient">Conclusion: Infrastructure Is Necessary, But Not Sufficient</h4>

<p>Gartner expects around 40% of agentic AI projects to fail by 2027 – not because the technology falls short, but because organizations automate existing, immature processes instead of rethinking them. A resilient infrastructure with clear governance for non-human identities, a high-performance data layer, and scalable model serving is therefore a prerequisite – but only a prerequisite. The real success factor lies in designing business processes so that agents can be meaningfully embedded, rather than automating existing workflows unchanged.</p>

<p>For organizations investing in agentic AI now, it’s worth paying at least as much attention to the storage and governance layer as to the agent framework itself. Those who account for this layer from the outset not only reduce the risk of failed projects but also lay the foundation to scale agentic AI use cases beyond isolated pilot projects.</p>

<p>FSxN offers a solid starting point here for building in performance, security, and testability from day one – as the link between the flexibility of autonomous agents and the control requirements of production enterprise environments. In an upcoming post, we’ll look at a concrete reference architecture that brings these building blocks together into a production-ready agentic AI pipeline with FSxN.</p>]]></content><author><name>Fabian Born</name><email>blog@fabianborn.net</email></author><category term="AI" /><category term="Post" /><category term="AI" /><category term="AWS" /><category term="FSxN" /><category term="NetApp" /><summary type="html"><![CDATA[Agentic AI as an Infrastructure Driver What Autonomous Agents Demand from the Public […]]]></summary></entry><entry><title type="html">FSx for NetApp ONTAP S3 Access Points</title><link href="https://fabianborn.net/2026/03/fsx-for-netapp-ontap-s3-access-points/" rel="alternate" type="text/html" title="FSx for NetApp ONTAP S3 Access Points" /><published>2026-03-20T00:00:00+00:00</published><updated>2026-03-20T00:00:00+00:00</updated><id>https://fabianborn.net/2026/03/fsx-for-netapp-ontap-s3-access-points</id><content type="html" xml:base="https://fabianborn.net/2026/03/fsx-for-netapp-ontap-s3-access-points/"><![CDATA[<h2 id="use-your-nas-data-directly-for-ai--analytics">Use Your NAS Data Directly for AI &amp; Analytics</h2>

<p>If you’ve ever tried to feed NFS or SMB data from FSx for ONTAP into a SageMaker pipeline or a Bedrock Knowledge Base, you know the drill: copy the data, convert the format, refactor the app – and all of that before a single query even runs. With <strong>S3 Access Points for FSx for NetApp ONTAP</strong>(announced at AWS re:Invent 2025), those days are over.</p>

<h2 id="the-problem-nas-and-s3-dont-speak-the-same-language">The Problem: NAS and S3 Don’t Speak the Same Language</h2>

<p>Traditional file workloads live on NFS or SMB shares. But modern AI/ML and analytics services on AWS almost exclusively speak S3. The result has always been the same: data pipelines that are really just glorified bridges, and storage costs that hit you twice.</p>

<h2 id="the-solution-s3-access-points-directly-on-ontap-volumes">The Solution: S3 Access Points Directly on ONTAP Volumes</h2>

<p>S3 Access Points for FSx for ONTAP solve this elegantly: an access point attaches directly to an ONTAP volume and exposes its contents via the S3 API – <strong>without a single byte being copied</strong>.</p>

<p>In practice, this means NFS/SMB data can now be accessed using standard S3 operations like <code class="language-plaintext highlighter-rouge">GetObject</code>, <code class="language-plaintext highlighter-rouge">PutObject</code>, or <code class="language-plaintext highlighter-rouge">ListObjectsV2</code>. From the calling application’s perspective, it looks just like a regular S3 bucket.</p>

<h2 id="access-control-iam-meets-filesystem-identities">Access Control: IAM Meets Filesystem Identities</h2>

<p>Each access point comes with two layers of security:</p>

<ol>
  <li><strong>IAM policy</strong> – controls which AWS principals are allowed to access it</li>
  <li><strong>Filesystem identity</strong> – a UNIX or Windows user under which all S3 requests are authorized on the volume</li>
</ol>

<p>On top of that: public access is blocked by default and cannot be changed. Access can also be restricted to a specific VPC – just like you’d expect from S3 VPC Access Points.</p>

<p>Multiple access points per volume are supported, each with its own IAM policy set and its own user identity.</p>

<h2 id="setup-in-under-5-minutes">Setup in Under 5 Minutes</h2>

<p>Here’s what creating one looks like via the AWS CLI:</p>

<div class="language-shell highlighter-rouge"><div class="highlight"><pre class="highlight"><code>aws fsx create-and-attach-s3-access-point <span class="se">\</span>
  <span class="nt">--name</span> my-ontap-ap <span class="se">\</span>
  <span class="nt">--type</span> ONTAP <span class="se">\</span>
  <span class="nt">--ontap-configuration</span> <span class="nv">VolumeId</span><span class="o">=</span>fsvol-0123456789abcdef9,FileSystemIdentity<span class="o">=</span><span class="s1">'{Type=UNIX,UnixUser:{Name=ec2-user}}'</span> <span class="se">\</span>
  <span class="nt">--s3-access-point</span> <span class="nv">VpcConfiguration</span><span class="o">=</span><span class="s1">'{VpcId=vpc-0123467}'</span>
</code></pre></div></div>

<p>You can also do this through the FSx Console or the AWS SDK. Once created, the access point gets a unique alias – this is what AWS services use as the S3 bucket name.</p>

<h2 id="use-cases-where-this-really-shines">Use Cases: Where This Really Shines</h2>

<p>With support for over 50 AWS services, the range of use cases is broad. Here are the most exciting scenarios for cloud engineers:</p>

<ul>
  <li><strong>Generative AI / RAG</strong>: Build Amazon Bedrock Knowledge Bases directly on top of existing enterprise data – no data migration, no preprocessing job</li>
  <li><strong>ML Training</strong>: SageMaker training jobs read directly from NAS data</li>
  <li><strong>Serverless Analytics</strong>: Run Athena queries on file data without first firing up a Glue crawler against an S3 bucket</li>
  <li><strong>ETL</strong>: AWS Glue reads from and writes directly to the ONTAP volume</li>
  <li><strong>BI</strong>: Amazon QuickSight can query file data directly</li>
  <li><strong>Third-party tools</strong>: Snowflake and Databricks are supported as well</li>
</ul>

<h2 id="what-stays-the-same-on-ontap">What Stays the Same on ONTAP</h2>

<p>All of ONTAP’s storage efficiency features remain fully intact: deduplication, compression, snapshots, FlexClone, and storage tiering all continue to work as before. The S3 access point is purely an interface feature – the data still lives natively on ONTAP.</p>

<p>Latency is in line with standard S3 access – milliseconds – which is more than sufficient for most batch and streaming workloads.</p>

<h2 id="availability">Availability</h2>

<p>S3 Access Points for FSx for ONTAP are available in all AWS regions where FSx for ONTAP is offered. No opt-in, no preview – ready to use today.</p>

<h2 id="conclusion">Conclusion</h2>

<p>S3 Access Points for FSx for ONTAP are a genuine game-changer for anyone looking to bridge file workloads and cloud-native AI/analytics services. The approach is pragmatic: break down data silos not by migrating data, but by building smart protocol bridges. If you’re running ONTAP volumes and have Bedrock, SageMaker, or Athena on your radar, this feature deserves a spot at the top of your list.</p>]]></content><author><name>Fabian Born</name><email>blog@fabianborn.net</email></author><category term="AI" /><category term="howto" /><category term="AI" /><category term="AWS" /><category term="Cloud" /><category term="FSxN" /><category term="NetApp" /><summary type="html"><![CDATA[Use Your NAS Data Directly for AI & Analytics If you’ve ever tried […]]]></summary></entry><entry><title type="html">AI and FSxN in AWS</title><link href="https://fabianborn.net/2025/10/ai-and-fsxn-in-aws/" rel="alternate" type="text/html" title="AI and FSxN in AWS" /><published>2025-10-11T00:00:00+00:00</published><updated>2025-10-11T00:00:00+00:00</updated><id>https://fabianborn.net/2025/10/ai-and-fsxn-in-aws</id><content type="html" xml:base="https://fabianborn.net/2025/10/ai-and-fsxn-in-aws/"><![CDATA[<h2 id="practical-use-cases-with-amazon-fsx-for-netapp-ontap">Practical Use Cases with Amazon FSx for NetApp ONTAP</h2>

<p>Artificial Intelligence (AI) is transforming how companies use data, develop products, and optimize business models. Yet one success factor often remains in the background: the data infrastructure. In AWS, <strong>Amazon FSx for NetApp ONTAP</strong> plays a central role because it delivers AI workloads with high speed, flexibility, and enterprise-grade features.</p>

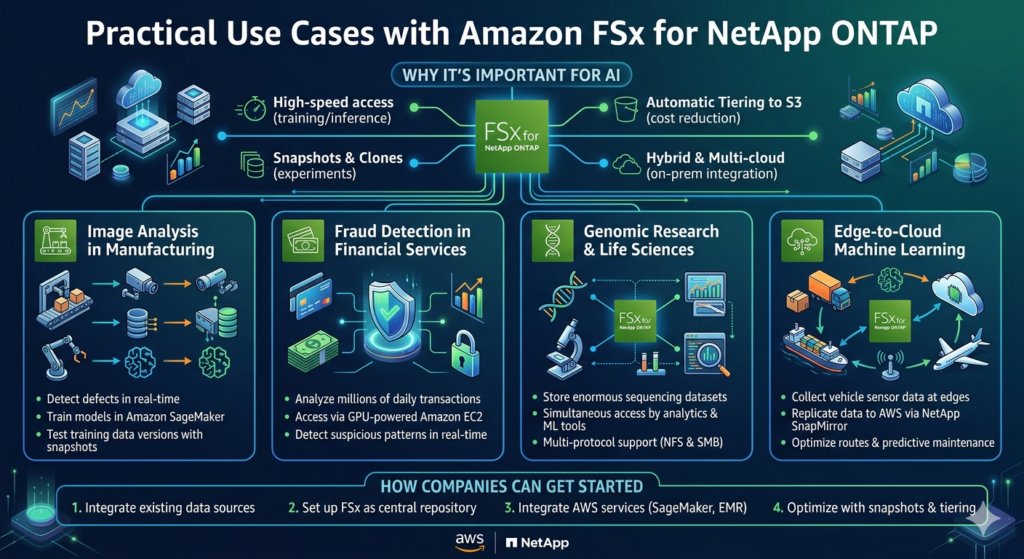
<h3 id="why-fsx-for-netapp-ontap-is-so-important-for-ai">Why FSx for NetApp ONTAP Is So Important for AI</h3>

<p>When AI models are trained, they require massive amounts of data – images, texts, transactions, or IoT sensor data. It’s not just about capacity, but also about performance and easy collaboration. FSx for NetApp ONTAP provides:</p>

<ul>
  <li>High-speed access to data for training and inference workloads</li>
  <li>Snapshots and clones for quick experiments when multiple teams work on models simultaneously</li>
  <li>Automatic tiering into S3 to reduce costs without developer overhead</li>
  <li>Seamless hybrid and multi-cloud integration so on-premises data can be easily incorporated</li>
</ul>

<h2 id="practical-use-cases-in-ai">Practical Use Cases in AI</h2>

<p><img src="/assets/images/posts/ai-and-fsxn-in-aws/IMG_8019-1024x559.png" alt="" /></p>

<h3 id="image-analysis-in-manufacturing">Image Analysis in Manufacturing</h3>

<p>An automotive manufacturer uses cameras to monitor production lines. The image data is stored in FSx for NetApp ONTAP. From there, data science teams train models in <strong>Amazon SageMaker</strong> to detect defects in real time. With snapshots, different versions of training data can be tested without consuming additional storage.</p>

<h3 id="fraud-detection-in-financial-services">Fraud Detection in Financial Services</h3>

<p>A bank analyzes millions of transactions daily. With FSx as a high-performance storage source, <strong>GPU-powered Amazon EC2 instances</strong> can access the data directly. Models detect suspicious patterns almost in real time. Thanks to FSx’s high IOPS, ad-hoc analyses can run in parallel without slowing down production systems.</p>

<h3 id="genomic-research-and-life-sciences">Genomic Research and Life Sciences</h3>

<p>Medical research generates enormous sequencing datasets. These are stored in FSx for NetApp ONTAP and accessed simultaneously by analytics tools, ML workflows in SageMaker, and visualization platforms. Multi-protocol support (NFS and SMB) allows easy integration across heterogeneous research environments.</p>

<h3 id="edge-to-cloud-machine-learning">Edge-to-Cloud Machine Learning</h3>

<p>A logistics company collects sensor data from vehicle fleets at distributed locations. Through NetApp SnapMirror replication, this data is regularly sent to AWS into FSx. There, models are trained using SageMaker and then deployed back to the edge – optimizing routes or enabling predictive maintenance.</p>

<h3 id="how-companies-can-get-started">How Companies Can Get Started</h3>

<p>The path to practical AI implementation is simpler than it seems:</p>

<ol>
  <li>Integrate existing data sources – whether from on-premises networks or existing S3 buckets.</li>
  <li>Set up FSx as the central data repository so all AI teams can access the same consistent datasets.</li>
  <li>Integrate AWS services such as SageMaker or EMR to prepare data and train models.</li>
  <li>Optimize with snapshots and tiering to stay flexible when new requirements arise.</li>
</ol>

<h2 id="conclusion">Conclusion</h2>

<p>For AI projects in AWS, success requires more than just computing power. The foundation is a data platform that ensures speed, manageability, and cost efficiency. <strong>Amazon FSx for NetApp ONTAP</strong> meets these needs and enables companies to implement AI projects faster, safer, and more effectively — whether in manufacturing, financial services, or research.</p>

<p>Would you like me to enrich this English version with a <strong>fictional case study</strong>, such as a mid-sized company successfully adopting AI with FSx, to make it even more engaging?</p>]]></content><author><name>Fabian Born</name><email>blog@fabianborn.net</email></author><category term="inspiration" /><category term="Post" /><category term="AI" /><category term="AWS" /><category term="Cloud" /><category term="FSxN" /><summary type="html"><![CDATA[Practical Use Cases with Amazon FSx for NetApp ONTAP Artificial Intelligence (AI) is […]]]></summary></entry><entry><title type="html">Quota Report for FSxN – Daily Reports</title><link href="https://fabianborn.net/2025/07/quota-report-for-fsxn-daily-reports/" rel="alternate" type="text/html" title="Quota Report for FSxN – Daily Reports" /><published>2025-07-03T00:00:00+00:00</published><updated>2025-07-03T00:00:00+00:00</updated><id>https://fabianborn.net/2025/07/quota-report-for-fsxn-daily-reports</id><content type="html" xml:base="https://fabianborn.net/2025/07/quota-report-for-fsxn-daily-reports/"><![CDATA[<p>Gigabyte-accurate billing – charge-back to your own customers – this requires a stable and secure solution. The evaluation should be as granular as possible, but in the end, for example, billing takes place at the end of the month. NetApp ONTAP provides the necessary tools directly: Quotas are the keyword. It is possible to display the data both via CLI and via the Rest API.</p>

<p>Especially in the cloud environment, such issues need to be automated. AWS offers the ideal platform for precisely such tasks.</p>

<h4 id="requirements">Requirements</h4>

<p>In order to be able to use the following script at all, quotas must be activated on FSxN (and all other ONTAP systems). This can be done via the CLI or via the Rest API. The article itself only shows the way via the CLI.</p>

<div class="language-shell highlighter-rouge"><div class="highlight"><pre class="highlight"><code>quota policy create <span class="nt">-vserver</span> &lt;svm&gt; <span class="nt">-policy-name</span> charge-back
quota on <span class="nt">-vserver</span>  &lt;svm&gt; <span class="nt">-volume</span> &lt;volume&gt;
</code></pre></div></div>

<p>After the preparations for the quota have been made, it must be activated on each volume. Ideally, this is solved via automation or you can repeat the following command for each volume:</p>

<div class="language-shell highlighter-rouge"><div class="highlight"><pre class="highlight"><code>quota policy rule create <span class="nt">-vserver</span> &lt;svm&gt; <span class="nt">-policy-name</span> charge-back <span class="nt">-volume</span> &lt;volume&gt; <span class="nt">-type</span> tree <span class="nt">-target</span> <span class="s2">""</span> <span class="nt">-threshold</span> 85
</code></pre></div></div>

<p><strong>Note:</strong> The configured quota only shows the memory used and the number of files in the volume/Qtree. If you really want to limit the maximum size here, the parameter <strong>-disk-limit</strong> or <strong>-soft-disk-limit</strong> must be set!</p>

<p>The quota settings can be verified with <code class="language-plaintext highlighter-rouge">quota report -vserver &lt;svm&gt; -volume</code> <volume></volume></p>

<h4 id="architecture">Architecture</h4>

<p><img src="/assets/images/posts/quota-report-for-fsxn-daily-reports/fsxn_quotareport-1024x632.png" alt="" /></p>

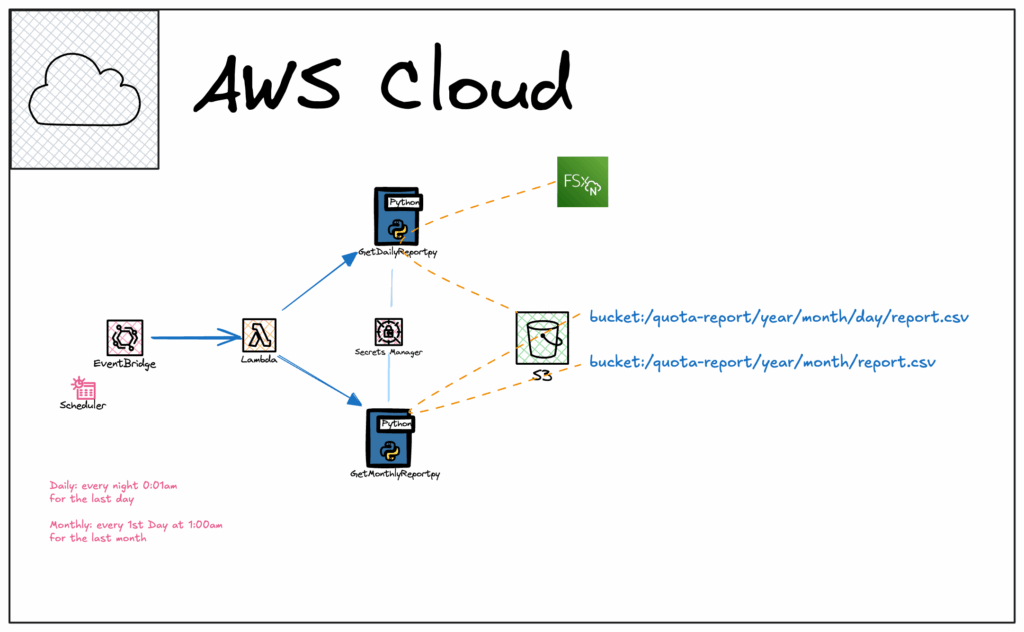
<p>The following components are used for the automated quota reports:</p>

<ul>
  <li>AWS EventBridge (former AWS CloudWatch Events)</li>
  <li>AWS Lambda</li>
  <li>AWS Secret Manager</li>
  <li>AWS S3</li>
</ul>

<p>AWS EventBridge uses the scheduler to create the reports. This defines when the reports are created. The runs must always be executed at the same time. Two schedules are created in EventBridge for the quota report creation: <strong>Daily</strong> and <strong>Monthly</strong></p>

<p>Both schedules call a Lambda function that collects the quota reports and writes them to an S3 bucket.</p>

<p>Two Lambda functions are required for these reports, namely one for the daily and one for the monthly reports. Both functions are written in Python and can be found on my <a href="https://github.com/fabian-born/fsxn-helpers/tree/main/quota-reports">GitHub repo</a>.</p>

<h4 id="the-process">The Process</h4>

<p>There is the Daily and the Monthly. Both scripts are available in two different versions. The scripts with <strong><em>_v2</em></strong> are for the Lambda functions; the other two can be used to execute them from a Linux host.</p>

<p>But what does the process look like? The EventBridge starts the GenerateDailyQuotaReport_v2 every day and this runs through various steps:</p>

<ol>
  <li>Querying the credentials for the FSxN systems from the Secret Manager</li>
  <li>Reading out the FSxN systems in the VPC</li>
  <li>Connection to the FSxN Rest API via Management IP</li>
  <li>Reading the quota information</li>
  <li>Conversion to CSV and JSON for CloudWatch</li>
  <li>Upload to S3</li>
</ol>

<p><strong>Note:</strong> It is important to know that the output represents the data of the previous day. For this reason, the scheduler should be set to 0:01am.</p>

<p>The <strong>GenerateMonthlyQuotaReport_v2</strong> script</p>

<ol>
  <li>Connect to the bucket and reads all CSVs in the Daily folder</li>
  <li>Consolidating all into a monthly report</li>
  <li>Upload to S3</li>
</ol>

<h4 id="eventbridge--lambda-configuration">Eventbridge + Lambda configuration</h4>

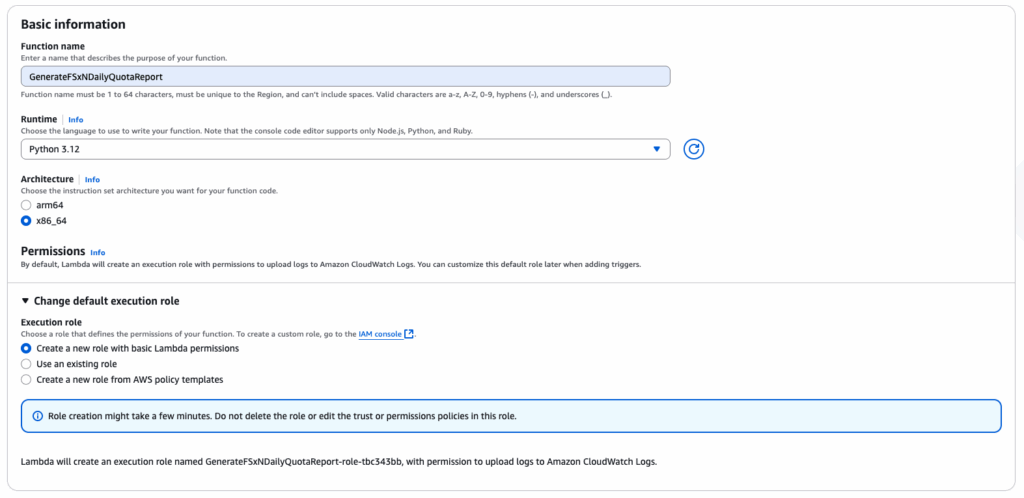
<p>Let’s see, how it will be configured: In <strong>AWS Console</strong> -&gt; <strong>Lambda</strong> -&gt; <strong>Create function</strong> -&gt; <strong>Author from scratch</strong></p>

<p><img src="/assets/images/posts/quota-report-for-fsxn-daily-reports/image-6-1024x498.png" alt="" /></p>

<p>Open <strong>Additional configurations</strong>, <strong>enable VPC</strong>, and select your VPCs and subnets where the FSxN Systems are located. Apply a Security Group that allows HTTPS to the FSxN Systems. If you need more options, feel free to select. Then press “<strong>create function</strong>“.</p>

<p>Apply this additional policy to the generated Role</p>

<div class="language-json highlighter-rouge"><div class="highlight"><pre class="highlight"><code><span class="p">{</span><span class="w">  
    </span><span class="nl">"Version"</span><span class="p">:</span><span class="w"> </span><span class="s2">"2012-10-17"</span><span class="p">,</span><span class="w">  
    </span><span class="nl">"Statement"</span><span class="p">:</span><span class="w"> </span><span class="p">[</span><span class="w">  
        </span><span class="p">{</span><span class="w">  
            </span><span class="nl">"Sid"</span><span class="p">:</span><span class="w"> </span><span class="s2">"AdditionalPolicies"</span><span class="p">,</span><span class="w">  
            </span><span class="nl">"Effect"</span><span class="p">:</span><span class="w"> </span><span class="s2">"Allow"</span><span class="p">,</span><span class="w">  
            </span><span class="nl">"Action"</span><span class="p">:</span><span class="w"> </span><span class="p">[</span><span class="w">  
                </span><span class="s2">"fsx:DescribeFileSystems"</span><span class="p">,</span><span class="w">  
                </span><span class="s2">"s3:GetObject"</span><span class="p">,</span><span class="w">  
                </span><span class="s2">"s3:PutObject"</span><span class="p">,</span><span class="w">  
                </span><span class="s2">"secretsmanager:GetSecretValue"</span><span class="p">,</span><span class="w">  
                </span><span class="s2">"secretsmanager:DescribeSecret"</span><span class="w">  
            </span><span class="p">],</span><span class="w">  
            </span><span class="nl">"Resource"</span><span class="p">:</span><span class="w"> </span><span class="s2">"*"</span><span class="w">  
        </span><span class="p">}</span><span class="w">  
    </span><span class="p">]</span><span class="w">  
</span><span class="p">}</span><span class="w">
</span></code></pre></div></div>

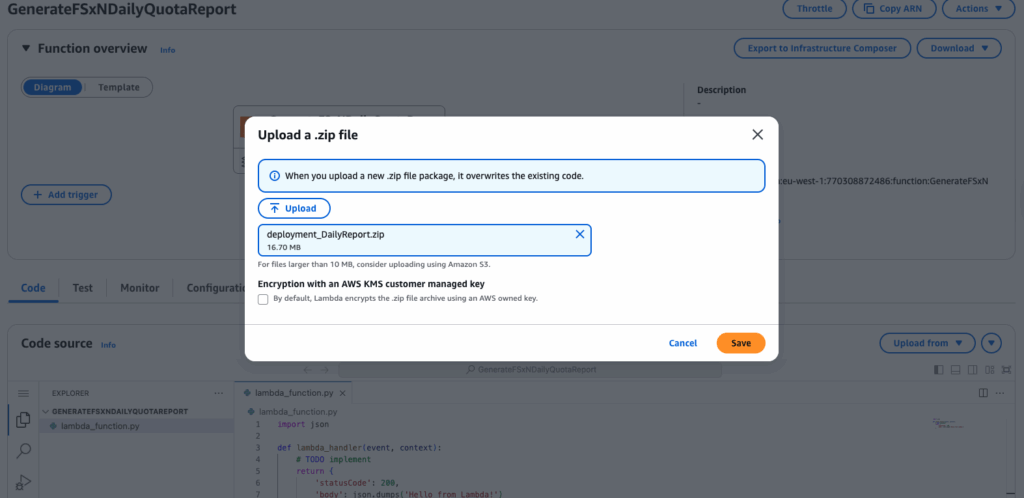
<p>Generate the deployment package file by running the <code class="language-plaintext highlighter-rouge">GenerateDeploymentPackage.sh</code>, which is available in the GitHub repo.</p>

<p>Upload the package file to the Lambda function.</p>

<p><img src="/assets/images/posts/quota-report-for-fsxn-daily-reports/image-7-1024x498.png" alt="" /></p>

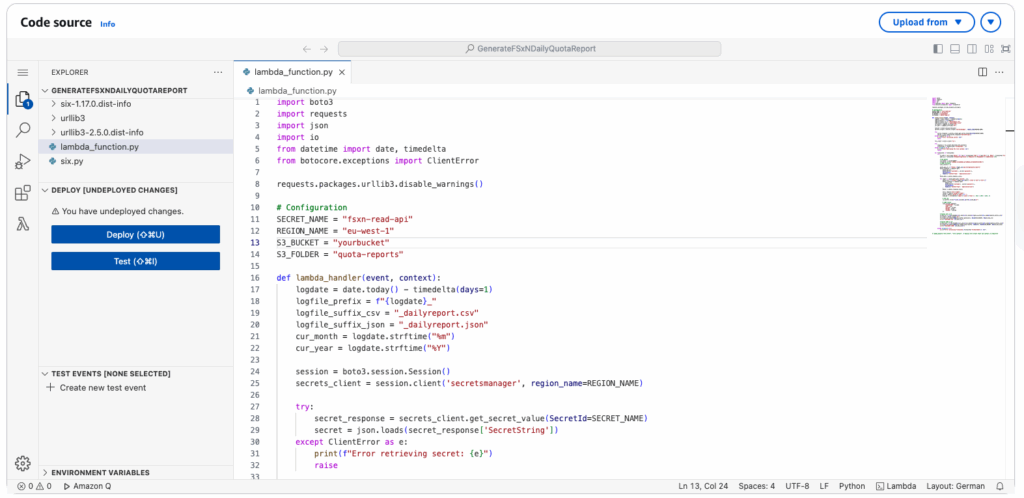
<p>Change the variables in the configuration part in the script and press “deploy” to activate the new code!</p>

<p><img src="/assets/images/posts/quota-report-for-fsxn-daily-reports/image-8-1024x498.png" alt="" /></p>

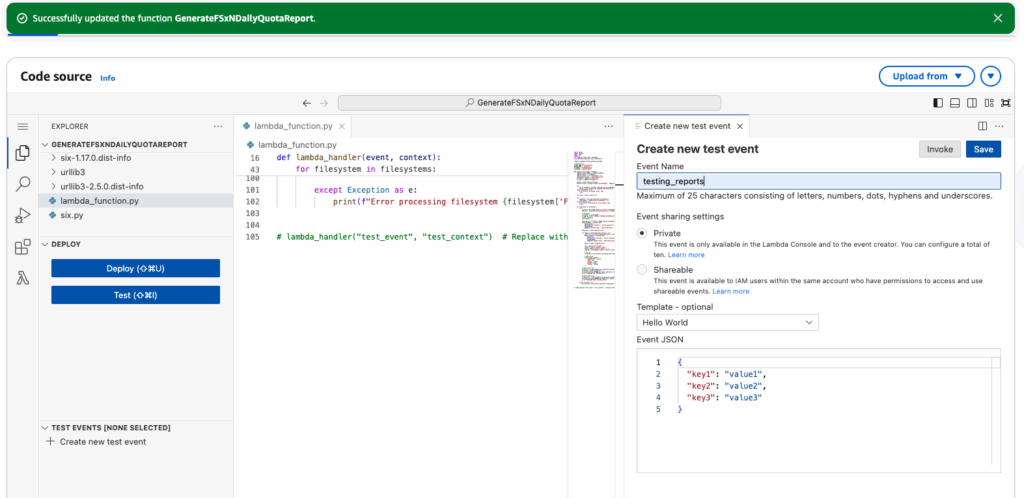
<p>After successful deployment the function can be tested.</p>

<p><img src="/assets/images/posts/quota-report-for-fsxn-daily-reports/image-9-1024x498.png" alt="" /></p>

<p>It can be default, because the event values have no impact to the function at the moment.</p>

<p>Change some configuration settings in the lambda functions:</p>

<ul>
  <li>Timeouts from 3s to 60s. It’s depending on how many FSxN Systems and Volumes/qtrees</li>
</ul>

<p>Now the function can be tested. The result will show a folder structure like this in the bucket:</p>

<p><img src="/assets/images/posts/quota-report-for-fsxn-daily-reports/image-10-1024x112.png" alt="" /></p>

<h4 id="plan-the-function">Plan the function</h4>

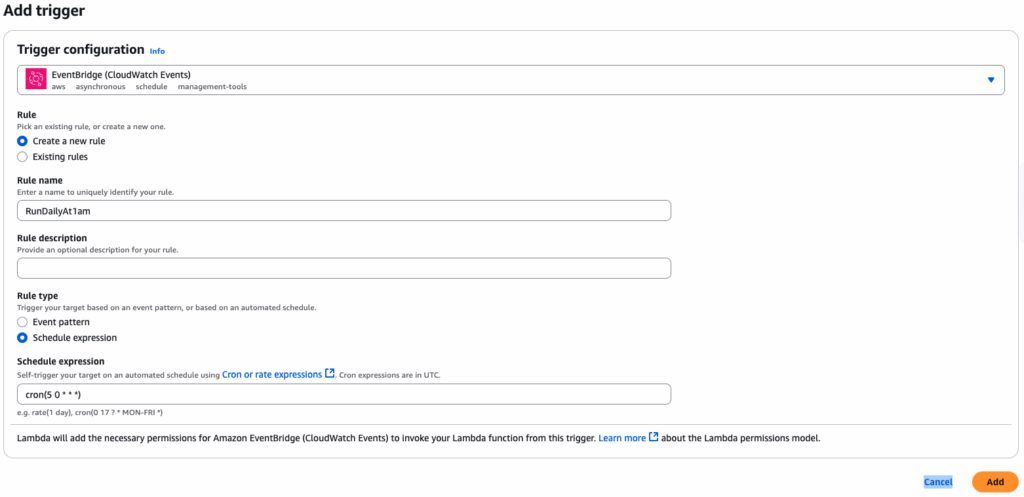
<p>Damit nun der Report täglich ausgeführt wird muss der Funktion noch ein Trigger hinzugefügt werden:</p>

<p><img src="/assets/images/posts/quota-report-for-fsxn-daily-reports/image-11.png" alt="" /></p>

<ul>
  <li>Type: EventBridge</li>
  <li>RuleName: i.e. RunDailyAt1h5am</li>
  <li>schedule expression: i.e. cron(5 1 * * ? *)</li>
</ul>

<p><img src="/assets/images/posts/quota-report-for-fsxn-daily-reports/image-13-1024x497.png" alt="" /></p>

<p>done.</p>

<p><strong>Next post will be about the Monthly report! Stay tuned!</strong></p>

<h5 id="additional-links">Additional Links:</h5>

<ul>
  <li>GitHub Repo: <a href="https://github.com/fabian-born/fsxn-helpers/tree/main/quota-reports">https://github.com/fabian-born/fsxn-helpers/tree/main/quota-reports</a></li>
  <li>NetApp Docs: <a href="https://docs.netapp.com/us-en/ontap/volumes/quota-report-quotas-effect-concept.html">https://docs.netapp.com/us-en/ontap/volumes/quota-report-quotas-effect-concept.html</a></li>
</ul>]]></content><author><name>Fabian Born</name><email>blog@fabianborn.net</email></author><category term="Automation" /><category term="howto" /><category term="AWS" /><category term="Cloud" /><category term="FSxN" /><summary type="html"><![CDATA[Gigabyte-accurate billing – charge-back to your own customers – this requires a stable […]]]></summary></entry><entry><title type="html">Multiprotocol environment with FSxN</title><link href="https://fabianborn.net/2025/05/2025-05-27-fsxn-multiprotocol/" rel="alternate" type="text/html" title="Multiprotocol environment with FSxN" /><published>2025-05-27T00:00:00+00:00</published><updated>2025-05-27T00:00:00+00:00</updated><id>https://fabianborn.net/2025/05/2025-05-27-fsxn-multiprotocol</id><content type="html" xml:base="https://fabianborn.net/2025/05/2025-05-27-fsxn-multiprotocol/"><![CDATA[<hr />

<h2 id="situation">Situation</h2>

<p>Customer operates its entire production environment in AWS. Users are managed centrally in the company’s Active Directory and access to resources is controlled via group memberships. The server environment consists primarily of Linux systems that are joined to the Active Directory with SSSD. FSx for NetApp ONTAP (FSxN) provides shared file systems for applications and employees. The pre-defined SVM (Storage Virtual Machine) is also an Active Directory member to enable authentication against the customer’s directory services.</p>

<h2 id="requirements">Requirements</h2>

<p>The challenge now is to make the SVM multi-protocol ready, which basically works out of the box. that the following requirements are met:</p>

<ul>
  <li>Authorization is based on group membership in Active Directory</li>
  <li>The leading access protocol is SMB</li>
  <li>Linux hosts should be able to mount the shared file systems via SMB and NFSv4.1</li>
  <li>Each shared file system must allow authorized users to create files and folders, read all data but limit them to only change or delete their own files and folders.</li>
</ul>

<h2 id="how-was-it-solved">How was it solved?</h2>

<p>To solve the requirement, two things need to be configured:</p>

<ol>
  <li>NFSv 4.1 including Kerberos and Active Directory</li>
  <li>NTFS file system permissions must be set.</li>
</ol>

<p>NetApp provides various documentation and technical reports for the configuration of NFSv4, which you can work through completely, or you can use the next steps.</p>

<h4 id="configuration-of-the-fsxn-system">Configuration of the FSxN system</h4>

<p><strong>note:</strong> the following steps need the “advanced priviledge”: <code class="language-plaintext highlighter-rouge">set adv</code></p>

<h4 id="enable-kerberos-on-fsxn">Enable Kerberos on FSxN</h4>

<div class="language-shell highlighter-rouge"><div class="highlight"><pre class="highlight"><code>kerberos realm create <span class="nt">-vserver</span> filestore <span class="nt">-realm</span> ad.epicshit.io <span class="nt">-kdc-vendor</span> Microsoft <span class="nt">-kdc-ip</span> 192.168.4.134 <span class="nt">-kdc-port</span> 88 <span class="nt">-clock-skew</span> 5 <span class="nt">-adminserver-ip</span> 192.168.4.134 <span class="nt">-adminserver-port</span> 749 <span class="nt">-passwordserver-ip</span> 192.168.4.134 <span class="nt">-passwordserver-port</span> 464 <span class="nt">-adserver-ip</span> 192.168.4.134 <span class="nt">-adserver-name</span> dc01.ad.epicshit.io
</code></pre></div></div>

<h4 id="enable-spn-for-nfs-interface">Enable SPN for NFS interface</h4>

<div class="language-shell highlighter-rouge"><div class="highlight"><pre class="highlight"><code>kerberos interface <span class="nb">enable</span> <span class="nt">-vserver</span> filestore <span class="nt">-lif</span> nfs_smb_management_1 <span class="nt">-spn</span> nfs/filestore.ad.epicshit.io@AD.EPICSHIT.IO <span class="nt">-admin-username</span> fboadm
</code></pre></div></div>

<p><strong>important</strong> This is the DNS name that will be used to mount the share later. This name must point to the IP address of the nfs_smb_management_1 interface</p>

<div class="language-text highlighter-rouge"><div class="highlight"><pre class="highlight"><code>net int show -vserver filestore 
  (network interface show)
            Logical    Status     Network            Current       Current Is
Vserver     Interface  Admin/Oper Address/Mask       Node          Port    Home
----------- ---------- ---------- ------------------ ------------- ------- ----
filestore
            iscsi_1      up/up    10.64.22.173/24    FsxId0ebcb5e155ad2b3cd-01 
                                                                   e0e     true
            iscsi_2      up/up    10.64.22.182/24    FsxId0ebcb5e155ad2b3cd-02 
                                                                   e0e     true
            nfs_smb_management_1 
                         up/up    10.64.22.99/24     FsxId0ebcb5e155ad2b3cd-01 
                                                                   e0e     true

nslookup filestore.ad.epicshit.io                                                                                                               ─╯
Server:     192.168.4.134
Address:    192.168.4.134#53

Non-authoritative answer:
Name:   filestore.ad.epicshit.io
Address: 10.64.22.99
</code></pre></div></div>

<h4 id="configure-ldap-client">Configure ldap client</h4>

<div class="language-shell highlighter-rouge"><div class="highlight"><pre class="highlight"><code>vserver services name-service ldap client create <span class="nt">-vserver</span> filestore <span class="nt">-client-config</span> filestore <span class="nt">-ad-domain</span> ad.epicshit.io <span class="nt">-bind-as-cifs-server</span> <span class="nb">true</span> <span class="nt">-schema</span> MS-AD-BIS
vserver services name-service ns-switch modify <span class="nt">-vserver</span> filestore  <span class="nt">-database</span> passwd,group <span class="nt">-sources</span> ldap,files 
vserver services name-service ldap create <span class="nt">-vserver</span> filestore <span class="nt">-client-config</span> filestore
</code></pre></div></div>

<h4 id="change-the-nfsv4-domain-of-the-svm">Change the NFSv4 Domain of the SVM</h4>

<div class="language-shell highlighter-rouge"><div class="highlight"><pre class="highlight"><code>vserver nfs modify <span class="nt">-vserver</span> filestore <span class="nt">-v4-id-domain</span> ad.epicshit.io
</code></pre></div></div>

<h4 id="now-create-the-user-mapping-for-linux--kerberos">Now create the user mapping for Linux – Kerberos</h4>

<div class="language-shell highlighter-rouge"><div class="highlight"><pre class="highlight"><code>vserver name-mapping create <span class="nt">-vserver</span> filestore <span class="nt">-direction</span> krb-unix <span class="nt">-position</span> 1 <span class="nt">-pattern</span> <span class="o">(</span>.+<span class="o">)</span><span class="nv">$@</span>.<span class="k">*</span> <span class="nt">-replacement</span> pcuser
vserver name-mapping create <span class="nt">-vserver</span> filestore <span class="nt">-direction</span> krb-unix <span class="nt">-position</span> 2 <span class="nt">-pattern</span> <span class="o">(</span>.+<span class="o">)</span>@.<span class="k">*</span> <span class="nt">-replacement</span> 1
vserver name-mapping create <span class="nt">-vserver</span> filestore <span class="nt">-direction</span> win-unix <span class="nt">-position</span> 1 <span class="nt">-pattern</span> AD<span class="se">\(</span>.+<span class="o">)</span> <span class="nt">-replacement</span> 1
vserver name-mapping create <span class="nt">-vserver</span> filestore <span class="nt">-direction</span> unix-win <span class="nt">-position</span> 2 <span class="nt">-pattern</span> <span class="o">(</span>.+<span class="o">)</span> <span class="nt">-replacement</span> AD<span class="se">\1</span>
</code></pre></div></div>

<h4 id="verify-user-mapping-on-fsxn">Verify user mapping on FSxN</h4>

<div class="language-text highlighter-rouge"><div class="highlight"><pre class="highlight"><code>vserver services access-check authentication show-creds -vserver filestore -win-name fabian

 UNIX UID: fabian &lt;&gt; Windows User: ADfabian (Windows Domain User)

 GID: users
 Supplementary GIDs: 
  users

 Primary Group SID: ADDomain Users (Windows Domain group)

 Windows Membership:
  ADlinux_allow_sudo_leitbache (Windows Domain group)
  ADDomain Users (Windows Domain group)
  ADlinux_allow_sudo (Windows Domain group)
  Service asserted identity (Windows Well known group)
  BUILTINUsers (Windows Alias)
 User is also a member of Everyone, Authenticated Users, and Network Users

 Privileges (0x2080):
  SeChangeNotifyPrivilege
</code></pre></div></div>

<p>or</p>

<div class="language-text highlighter-rouge"><div class="highlight"><pre class="highlight"><code>vserver services access-check authentication show-creds -vserver filestore -win-name adjodoe

 UNIX UID: pcuser &lt;&gt; Windows User: ADjodoe (Windows Domain User)

 GID: pcuser
 Supplementary GIDs: 
  pcuser
</code></pre></div></div>

<p>As you can see in the second output, the user exists in the Active Directory, but not as a Unix user in ONTAP. To have a clean Win-&gt;Unix and Unix-&gt;Win user mapping, you have to create the user in the SVM on FSxN:</p>

<div class="language-shell highlighter-rouge"><div class="highlight"><pre class="highlight"><code>vserver services unix-user create <span class="nt">-vserver</span> filestore <span class="nt">-user</span> jodoe <span class="nt">-id</span> &lt;AD uidNumber&gt; <span class="nt">-primary-gid</span> &lt;AD gidNumber&gt;
</code></pre></div></div>

<h4 id="mount-the-exports--shares">Mount the exports / shares</h4>

<p>Especially in the AD and NFSv4 context, it is important to work with the correct DNS names. <strong>Note</strong> for mounting use the active directory dns name and not the management name from the AWS console!</p>

<p>The file system can now be mounted.</p>

<div class="language-shell highlighter-rouge"><div class="highlight"><pre class="highlight"><code>nfs:    mount <span class="nt">-t</span> nfs <span class="nt">-o</span> <span class="nv">vers</span><span class="o">=</span>4.1,sec<span class="o">=</span>krb5 filestore.ad.epicshit.io:/nfs1 /share/
smb:    mount <span class="nt">-t</span> cifs <span class="nt">-o</span> <span class="nv">username</span><span class="o">=</span>fabian,multiuser,sec<span class="o">=</span>krb5 //filestore.ad.epicshit.io/smbonnfs1 /share/smb1/
</code></pre></div></div>

<p>Additional notes:<br />
Possible options for sec= with Kerberos:<br />
<strong>krb5</strong> Use Kerberos for authentication only<br />
<strong>krb5i</strong>  Use Kerberos for authentication and hash traffic between client and server to ensure integrity<br />
<strong>krb5p</strong>  Use Kerberos for authentication and encrypt traffic between client and server</p>

<h2 id="set-the-ntfs-permissions">Set the NTFS permissions</h2>

<h4 id="creating-an-ntfs-security-descriptor">Creating an NTFS security descriptor</h4>

<div class="language-shell highlighter-rouge"><div class="highlight"><pre class="highlight"><code>vserver security file-directory ntfs create <span class="nt">-vserver</span> filestore <span class="nt">-ntfs-sd</span> sd01 <span class="nt">-owner</span> ADAdministrator
</code></pre></div></div>

<p>Adding ‘-control-flags-raw 0x9014’ disables inheritance, only the defined ACL are set. Use this if permissions are not applied to a volume.</p>

<div class="language-shell highlighter-rouge"><div class="highlight"><pre class="highlight"><code>vserver security file-directory ntfs create <span class="nt">-vserver</span> filestore <span class="nt">-ntfs-sd</span> sd01 <span class="nt">-owner</span> ADAdministrator <span class="nt">-control-flags-raw</span> 0x9014
</code></pre></div></div>

<h4 id="removing-builtin-from-dacl-list">Removing BUILTIN* from DACL list</h4>

<div class="language-shell highlighter-rouge"><div class="highlight"><pre class="highlight"><code>vserver security file-directory ntfs dacl remove <span class="nt">-ntfs-sd</span> sd01 <span class="nt">-access-type</span> allow <span class="nt">-account</span> BUILTIN<span class="k">*</span> <span class="nt">-vserver</span> filestore
</code></pre></div></div>

<h4 id="adding-ntfs-dacl-access-control-entries-to-the-ntfs-security-descriptor">Adding NTFS DACL access control entries to the NTFS security descriptor</h4>

<div class="language-shell highlighter-rouge"><div class="highlight"><pre class="highlight"><code>vserver security file-directory ntfs dacl add <span class="nt">-ntfs-sd</span> sd01 <span class="nt">-access-type</span> allow <span class="nt">-account</span> <span class="s2">"ADDomain Users"</span> <span class="nt">-advanced-rights</span> read-data, execute-file, read-ea, read-attr, read-perm, write-data, append-data, write-attr <span class="nt">-vserver</span> filestore <span class="nt">-apply-to</span> this-folder,sub-folders,files
</code></pre></div></div>

<h4 id="verifying-dacl">Verifying DACL</h4>

<div class="language-text highlighter-rouge"><div class="highlight"><pre class="highlight"><code>vserver security file-directory ntfs dacl show -ntfs-sd sd01

Vserver: filestore
  NTFS Security Descriptor Name: sd01

    Account Name     Access   Access             Apply To
                     Type     Rights
    --------------   -------  -------            -----------
    ADDomain Users   
                     allow    read-data, execute-file, read-ea, read-attr, read-perm, write-data, append-data, write-attr   
                                                 this-folder, sub-folders, files
    CREATOR OWNER    allow    full-control       this-folder, sub-folders, files
    NT AUTHORITYSYSTEM   
                     allow    full-control       this-folder, sub-folders, files
3 entries were displayed.
</code></pre></div></div>

<h4 id="creating-a-security-policy-and-adding-a-task">Creating a security policy and adding a task</h4>

<div class="language-shell highlighter-rouge"><div class="highlight"><pre class="highlight"><code>vserver security file-directory policy create <span class="nt">-policy-name</span> sd01-policy <span class="nt">-vserver</span> filestore

vserver security file-directory policy task add <span class="nt">-policy-name</span> sd01-policy <span class="nt">-path</span> /nfs1/group1 <span class="nt">-ntfs-mode</span> propagate <span class="nt">-security-type</span> ntfs <span class="nt">-ntfs-sd</span> sd01  <span class="nt">-access-control</span> file-directory <span class="nt">-vserver</span> filestore
</code></pre></div></div>

<h4 id="applying-the-security-policy-on-ntfs-files-and-folders-using-the-cli">Applying the security policy on NTFS files and folders using the CLI</h4>

<div class="language-shell highlighter-rouge"><div class="highlight"><pre class="highlight"><code>vserver security file-directory apply <span class="nt">-vserver</span> filestore <span class="nt">-policy-name</span> sd01-policy
</code></pre></div></div>

<h4 id="monitoring-the-security-policy-job">Monitoring the security policy job</h4>

<div class="language-text highlighter-rouge"><div class="highlight"><pre class="highlight"><code>vserver security file-directory job show  -vserver filestore

vserver security file-directory job show  -vserver filestore                     
                            Owning
Job ID Name                 Vserver    Node           State
------ -------------------- ---------- -------------- ----------
2690   Fsecurity Apply      filestore  FsxId0ebcb5e155ad2b3cd-01 
                                                      Success
       Description: File Directory Security Apply Job
</code></pre></div></div>

<h4 id="verifying-the-applied-file-security">Verifying the applied file security</h4>

<div class="language-text highlighter-rouge"><div class="highlight"><pre class="highlight"><code>vserver security file-directory show -vserver filestore -path /nfs1/group1

                  Vserver: filestore
Dummy index for tree walk: -
                File Path: /nfs1/group1
        File Inode Number: 99
           Security Style: ntfs
          Effective Style: ntfs
           DOS Attributes: 10
   DOS Attributes in Text: ----D---
  Expanded Dos Attributes: -
             UNIX User Id: 0
            UNIX Group Id: 0
           UNIX Mode Bits: 777
   UNIX Mode Bits in Text: rwxrwxrwx
                     ACLs: NTFS Security Descriptor
                           Control:0x9014
                           Owner:ADAdministrator
                           Group:ADDomain Users
                           DACL - ACEs
                             ALLOW-ADDomain Users-0x1201af-OI|CI
                             ALLOW-CREATOR OWNER-0x1f01ff-OI|CI
                             ALLOW-NT AUTHORITYSYSTEM-0x1f01ff-OI|CI
</code></pre></div></div>

<h2 id="additional-links">Additional links</h2>

<p><a href="https://www.netapp.com/media/19384-tr-4616.pdf">TR-4616 – NFS Kerberos in ONTAP</a><br />
<a href="https://www.netapp.com/media/27436-tr-4887.pdf">TR-4887 – Multiprocotol NAS in NetApp ONTAP</a><br />
<a href="https://docs.netapp.com/us-en/ontap/nfs-admin/ontap-support-kerberos-concept.html">ONTAP Documentation</a></p>]]></content><author><name>Fabian Born</name><email>blog@fabianborn.net</email></author><category term="howto" /><category term="AWS" /><category term="Fileservices" /><category term="FSxN" /><category term="NetApp" /><category term="Ransomware" /><summary type="html"><![CDATA[Situation Customer operates its entire production environment in AWS. Users are managed centrally […]]]></summary></entry><entry><title type="html">NetApp Anti-Ransomware Protection with FSx for ONTAP (FSxN)</title><link href="https://fabianborn.net/2025/05/netapp-anti-ransomware-protection-with-fsx-for-ontap-fsxn/" rel="alternate" type="text/html" title="NetApp Anti-Ransomware Protection with FSx for ONTAP (FSxN)" /><published>2025-05-22T00:00:00+00:00</published><updated>2025-05-22T00:00:00+00:00</updated><id>https://fabianborn.net/2025/05/netapp-anti-ransomware-protection-with-fsx-for-ontap-fsxn</id><content type="html" xml:base="https://fabianborn.net/2025/05/netapp-anti-ransomware-protection-with-fsx-for-ontap-fsxn/"><![CDATA[<hr />

<p>Amazon FSx for NetApp ONTAP (FSxN) combines the power of NetApp’s ONTAP data management software with the scalability and flexibility of AWS. A key security feature in this service is the <strong>built-in anti-ransomware protection</strong>, which helps detect malicious activity and preserve data integrity using automated snapshots.</p>

<h2 id="key-features-of-netapp-anti-ransomware-protection">Key Features of NetApp Anti-Ransomware Protection</h2>

<ol>
  <li><strong>Real-time anomaly detection:</strong> Monitors I/O patterns to identify ransomware-like behavior.</li>
  <li><strong>Automatic snapshot creation:</strong> Creates read-only snapshots automatically when anomalies are detected.</li>
  <li><strong>ONTAP CLI management:</strong> Allows full control and monitoring via the ONTAP command line interface.</li>
</ol>

<h2 id="configuration-and-usage-via-ontap-cli-on-the-vserver-level">Configuration and Usage via ONTAP CLI on the vserver level</h2>

<h4 id="1-check-if-anti-ransomware-is-enabled">1. Check if Anti-Ransomware is Enabled</h4>

<div class="language-shell highlighter-rouge"><div class="highlight"><pre class="highlight"><code>vserver show <span class="nt">-fields</span> anti-ransomware-state
</code></pre></div></div>

<h4 id="2-enable-anti-ransomware-protection">2. Enable Anti-Ransomware Protection</h4>

<div class="language-shell highlighter-rouge"><div class="highlight"><pre class="highlight"><code>vserver modify <span class="nt">-vserver</span> &lt;SVM_NAME&gt; <span class="nt">-anti-ransomware-state</span> enabled
</code></pre></div></div>

<h4 id="3-check-the-learning-phase-status">3. Check the Learning Phase Status</h4>

<div class="language-shell highlighter-rouge"><div class="highlight"><pre class="highlight"><code>vserver show <span class="nt">-vserver</span> &lt;SVM_NAME&gt; <span class="nt">-fields</span> anti-ransomware-learning-state
</code></pre></div></div>

<h4 id="4-monitor-snapshot-activity-upon-detection">4. Monitor Snapshot Activity upon Detection</h4>

<div class="language-shell highlighter-rouge"><div class="highlight"><pre class="highlight"><code>volume snapshot show <span class="nt">-vserver</span> &lt;SVM_NAME&gt; <span class="nt">-volume</span> &lt;VOLUME_NAME&gt;
</code></pre></div></div>

<h4 id="5-restore-from-an-anti-ransomware-snapshot">5. Restore from an Anti-Ransomware Snapshot</h4>

<div class="language-shell highlighter-rouge"><div class="highlight"><pre class="highlight"><code>volume snapshot restore <span class="nt">-vserver</span> &lt;SVM_NAME&gt; <span class="nt">-volume</span> &lt;VOLUME_NAME&gt; <span class="nt">-snapshot</span> &lt;SNAPSHOT_NAME&gt;
</code></pre></div></div>

<h2 id="best-practices">Best Practices</h2>

<ul>
  <li>Regularly review snapshot retention policies.</li>
  <li>Integrate monitoring via CloudWatch and ONTAP EMS.</li>
  <li>Combine with AWS Backup or SnapMirror for comprehensive DR.</li>
</ul>

<h2 id="aditional-links">Aditional Links</h2>

<ul>
  <li><a href="https://docs.aws.amazon.com/fsx/latest/ONTAPGuide/ARP.html">AWS – Protecting your data with Autonomous Ransomware Protection</a></li>
</ul>]]></content><author><name>Fabian Born</name><email>blog@fabianborn.net</email></author><category term="howto" /><category term="ARP" /><category term="AWS" /><category term="Cloud" /><category term="FSxN" /><category term="NetApp" /><category term="Ransomware" /><category term="Security" /><summary type="html"><![CDATA[Amazon FSx for NetApp ONTAP (FSxN) combines the power of NetApp’s ONTAP data […]]]></summary></entry><entry><title type="html">Orchestrating Excellence – Argo CD</title><link href="https://fabianborn.net/2024/09/orchestrating-excellence-argo-cd/" rel="alternate" type="text/html" title="Orchestrating Excellence – Argo CD" /><published>2024-09-19T00:00:00+00:00</published><updated>2024-09-19T00:00:00+00:00</updated><id>https://fabianborn.net/2024/09/orchestrating-excellence-argo-cd</id><content type="html" xml:base="https://fabianborn.net/2024/09/orchestrating-excellence-argo-cd/"><![CDATA[<hr />

<h2 id="argo-cd-as-plattform">Argo CD as Plattform</h2>

<p>To create an Argo CD project, you need to define a project in Argo CD that manages access and deployment for your GitOps repositories and clusters. Here’s a step-by-step guide to building an Argo CD project using YAML:</p>

<h3 id="prerequisites">Prerequisites:</h3>

<ul>
  <li><strong>Argo CD installed and configured</strong> on your Kubernetes cluster.</li>
  <li><strong>kubectl</strong> configured to communicate with the cluster.</li>
</ul>

<h3 id="step-1-define-the-argo-cd-project-yaml">Step 1: Define the Argo CD Project YAML</h3>

<div class="language-yaml highlighter-rouge"><div class="highlight"><pre class="highlight"><code><span class="na">apiVersion</span><span class="pi">:</span> <span class="s">argoproj.io/v1alpha1</span>
<span class="na">kind</span><span class="pi">:</span> <span class="s">AppProject</span>
<span class="na">metadata</span><span class="pi">:</span>
  <span class="na">name</span><span class="pi">:</span> <span class="s">argocddemo</span> <span class="c1"># The name of the Argo CD project</span>
  <span class="na">namespace</span><span class="pi">:</span> <span class="s">argocd</span> <span class="c1"># The namespace where Argo CD is installed (usually 'argocd')</span>
<span class="na">spec</span><span class="pi">:</span>
  <span class="na">description</span><span class="pi">:</span> <span class="s2">"</span><span class="s">My</span><span class="nv"> </span><span class="s">project</span><span class="nv"> </span><span class="s">for</span><span class="nv"> </span><span class="s">managing</span><span class="nv"> </span><span class="s">apps</span><span class="nv"> </span><span class="s">with</span><span class="nv"> </span><span class="s">Argo</span><span class="nv"> </span><span class="s">CD"</span>
  <span class="c1"># Define which source repositories are allowed</span>
  <span class="na">sourceRepos</span><span class="pi">:</span>
    <span class="pi">-</span> <span class="s">https://github.com/myorg/myrepo.git</span>
  <span class="c1"># Define the destination clusters where Argo CD is allowed to deploy</span>
  <span class="na">destinations</span><span class="pi">:</span>
    <span class="pi">-</span> <span class="na">namespace</span><span class="pi">:</span> <span class="s">default</span>
      <span class="na">server</span><span class="pi">:</span> <span class="s">https://kubernetes.default.svc</span>
  <span class="c1"># Optional: Define cluster resource restrictions</span>
  <span class="na">clusterResourceWhitelist</span><span class="pi">:</span>
    <span class="pi">-</span> <span class="na">group</span><span class="pi">:</span> <span class="s1">'</span><span class="s">*'</span>
      <span class="na">kind</span><span class="pi">:</span> <span class="s1">'</span><span class="s">*'</span>
  <span class="c1"># Optional: Define namespace resource restrictions</span>
  <span class="na">namespaceResourceWhitelist</span><span class="pi">:</span>
    <span class="pi">-</span> <span class="na">group</span><span class="pi">:</span> <span class="s1">'</span><span class="s">*'</span>
      <span class="na">kind</span><span class="pi">:</span> <span class="s1">'</span><span class="s">*'</span>
  <span class="c1"># Optional: Configure roles and permissions</span>
  <span class="na">roles</span><span class="pi">:</span>
    <span class="pi">-</span> <span class="na">name</span><span class="pi">:</span> <span class="s">developer</span>
      <span class="na">description</span><span class="pi">:</span> <span class="s2">"</span><span class="s">Developer</span><span class="nv"> </span><span class="s">role</span><span class="nv"> </span><span class="s">with</span><span class="nv"> </span><span class="s">limited</span><span class="nv"> </span><span class="s">permissions"</span>
      <span class="na">policies</span><span class="pi">:</span>
        <span class="pi">-</span> <span class="s">p, proj:my-project:developer, applications, get, *, allow</span>
        <span class="pi">-</span> <span class="s">p, proj:my-project:developer, applications, create, *, allow</span>
      <span class="na">groups</span><span class="pi">:</span>
        <span class="pi">-</span> <span class="s">developers</span>
  <span class="c1"># Optional: Define sync windows for time-based deployments</span>
  <span class="na">syncWindows</span><span class="pi">:</span>
    <span class="pi">-</span> <span class="na">kind</span><span class="pi">:</span> <span class="s">allow</span>
      <span class="na">schedule</span><span class="pi">:</span> <span class="s2">"</span><span class="s">*</span><span class="nv"> </span><span class="s">*</span><span class="nv"> </span><span class="s">9-17</span><span class="nv"> </span><span class="s">*</span><span class="nv"> </span><span class="s">*</span><span class="nv"> </span><span class="s">1-5"</span>
      <span class="na">duration</span><span class="pi">:</span> <span class="s">8h</span>
      <span class="na">applications</span><span class="pi">:</span>
        <span class="pi">-</span> <span class="s1">'</span><span class="s">*'</span>
</code></pre></div></div>

<h3 id="explanation">Explanation:</h3>

<ol>
  <li><strong>apiVersion &amp; kind</strong>: Defines the kind of resource. Here it’s <code class="language-plaintext highlighter-rouge">AppProject</code>.</li>
  <li><strong>metadata</strong>:
    <ul>
      <li><code class="language-plaintext highlighter-rouge">name</code>: Name of the project, e.g., <code class="language-plaintext highlighter-rouge">argocddemo</code>.</li>
      <li><code class="language-plaintext highlighter-rouge">namespace</code>: Namespace where Argo CD is installed (<code class="language-plaintext highlighter-rouge">argocd</code> by default).</li>
    </ul>
  </li>
  <li><strong>spec</strong>:
    <ul>
      <li><strong>description</strong>: A short description of the project.</li>
      <li><strong>sourceRepos</strong>: The Git repository URL(s) allowed for this project.</li>
      <li><strong>destinations</strong>: Defines where Argo CD is allowed to deploy. You can restrict this by specifying a namespace and cluster.</li>
      <li><strong>clusterResourceWhitelist</strong>: Specifies which cluster-level resources are allowed (e.g., ConfigMaps, Custom Resource Definitions).</li>
      <li><strong>namespaceResourceWhitelist</strong>: Specifies which namespace-level resources are allowed (e.g., Deployments, Pods).</li>
      <li><strong>roles</strong>: Custom roles can be defined for specific actions like <code class="language-plaintext highlighter-rouge">create</code>, <code class="language-plaintext highlighter-rouge">get</code>, etc. These roles can be assigned to groups.</li>
      <li><strong>syncWindows</strong>: Optional section to limit deployments to certain time windows (e.g., during business hours).</li>
    </ul>
  </li>
</ol>

<h3 id="step-2-apply-the-project-yaml">Step 2: Apply the Project YAML</h3>

<p>Once your YAML is ready, you can apply it to your Kubernetes cluster using <code class="language-plaintext highlighter-rouge">kubectl</code>.</p>

<div class="language-shell highlighter-rouge"><div class="highlight"><pre class="highlight"><code>kubectl apply <span class="nt">-f</span> argocd-project.yaml
</code></pre></div></div>

<h3 id="step-3-verify-the-project-in-argo-cd">Step 3: Verify the Project in Argo CD</h3>

<p>You can verify that the project was successfully created by using either:</p>

<ul>
  <li><strong>Argo CD UI</strong>: Go to the Argo CD web UI and look for the <code class="language-plaintext highlighter-rouge">Projects</code> section.</li>
  <li><strong>kubectl</strong>:</li>
</ul>

<div class="language-shell highlighter-rouge"><div class="highlight"><pre class="highlight"><code>kubectl get appprojects <span class="nt">-n</span> argocd
</code></pre></div></div>

<h3 id="step-4-create-an-argo-cd-application-in-this-project">Step 4: Create an Argo CD Application in this Project</h3>

<p>Now that your project is set up, you can create an application that deploys resources from your Git repository to your Kubernetes cluster.</p>

<p>Example Argo CD Application YAML:</p>

<div class="language-yaml highlighter-rouge"><div class="highlight"><pre class="highlight"><code><span class="na">apiVersion</span><span class="pi">:</span> <span class="s">argoproj.io/v1alpha1</span>
<span class="na">kind</span><span class="pi">:</span> <span class="s">Application</span>
<span class="na">metadata</span><span class="pi">:</span>
  <span class="na">name</span><span class="pi">:</span> <span class="s">my-app</span>
  <span class="na">namespace</span><span class="pi">:</span> <span class="s">argocd</span>
<span class="na">spec</span><span class="pi">:</span>
  <span class="na">project</span><span class="pi">:</span> <span class="s">argocddemo</span>   <span class="c1"># Reference to the project created above</span>
  <span class="na">source</span><span class="pi">:</span>
    <span class="na">repoURL</span><span class="pi">:</span> <span class="s">https://github.com/myorg/myrepo.git</span>
    <span class="na">path</span><span class="pi">:</span> <span class="s">manifests</span>
    <span class="na">targetRevision</span><span class="pi">:</span> <span class="s">HEAD</span>
  <span class="na">destination</span><span class="pi">:</span>
    <span class="na">server</span><span class="pi">:</span> <span class="s">https://kubernetes.default.svc</span>
    <span class="na">namespace</span><span class="pi">:</span> <span class="s">default</span>
  <span class="na">syncPolicy</span><span class="pi">:</span>
    <span class="na">automated</span><span class="pi">:</span>
      <span class="na">prune</span><span class="pi">:</span> <span class="kc">true</span>
      <span class="na">selfHeal</span><span class="pi">:</span> <span class="kc">true</span>
</code></pre></div></div>

<p>Apply the application using:</p>

<div class="language-shell highlighter-rouge"><div class="highlight"><pre class="highlight"><code>kubectl apply <span class="nt">-f</span> argocd-application.yaml
</code></pre></div></div>

<p>This will deploy the resources defined in the Git repo under the <code class="language-plaintext highlighter-rouge">argocddemo</code> project.</p>

<h2 id="git-repo-for-argo-cd-applications">Git Repo for Argo CD applications</h2>

<p>To implement a Git repository structure for an Argo CD project, it’s important to organize the repository in a way that promotes scalability, modularity, and maintainability. This structure allows you to efficiently manage multiple environments (e.g., dev, staging, prod) and applications, along with reusable Kubernetes manifests (Helm charts, Kustomize, etc.).</p>

<p>Here’s an example for a Git repository structure for an Argo CD project:</p>

<p><strong>High-Level Directory Structure</strong></p>

<div class="language-text highlighter-rouge"><div class="highlight"><pre class="highlight"><code>├── apps/                # Contains the Argo CD applications
│   ├── dev/             # Manifests for the 'dev' environment
│   ├── staging/         # Manifests for the 'staging' environment
│   └── prod/            # Manifests for the 'prod' environment
├── base/                # Common base manifests, reusable for all environments
│   ├── app1/
│   └── app2/
├── environments/        # Environment-specific overlays (Kustomize or Helm)
│   ├── dev/
│   ├── staging/
│   └── prod/
├── helm-charts/         # Optional: Custom Helm charts (if using Helm)
│   ├── app1-chart/
│   └── app2-chart/
└── argocd-apps/         # Argo CD application definitions
    ├── dev-app.yaml
    ├── staging-app.yaml
    └── prod-app.yaml
</code></pre></div></div>

<p><strong>More on this topic in the next blog post 🙂</strong></p>]]></content><author><name>Fabian Born</name><email>blog@fabianborn.net</email></author><category term="howto" /><category term="argocd" /><category term="NetApp" /><category term="OpenShift" /><category term="Trident" /><summary type="html"><![CDATA[Argo CD as Plattform To create an Argo CD project, you need to […]]]></summary></entry><entry><title type="html">Orchestrating Excellence</title><link href="https://fabianborn.net/2024/09/orchestrating-excellence/" rel="alternate" type="text/html" title="Orchestrating Excellence" /><published>2024-09-11T00:00:00+00:00</published><updated>2024-09-11T00:00:00+00:00</updated><id>https://fabianborn.net/2024/09/orchestrating-excellence</id><content type="html" xml:base="https://fabianborn.net/2024/09/orchestrating-excellence/"><![CDATA[<hr />

<h2 id="title-orchestrating-excellence-date-2024-09-06-draft-false-categories-blog-tags-netappkubernetestridentdevopsbackup-banner-assetsimagescontentorchexcelljpg-layout-post-toc-true-author-fabian-born">title: “Orchestrating Excellence” date: 2024-09-06 draft: false categories: blog tags: [“NetApp”,”Kubernetes”,”Trident”,”DevOps”,”Backup”] banner: /assets/images/content/orchexcell.jpg layout: post toc: true author: “Fabian Born”</h2>

<h3 id="openshift-and-netapp-trident-integrated-with-gitops">OpenShift and NetApp Trident Integrated with GitOps</h3>

<p>In today’s IT landscape, automation and flexibility are key success factors. The effective integration of platforms like OpenShift, NetApp Trident, and GitOps brings us closer to a seamless DevOps environment that fosters both speed and stability.</p>

<p><strong>OpenShift</strong> serves as a robust container orchestration platform, providing an excellent foundation for running cloud-native applications. It enables developers to manage containers with great flexibility and scalability. However, managing persistent storage for stateful applications in container environments remains a challenge.</p>

<p>This is where <strong>NetApp Trident</strong> comes into play. Trident is an open-source storage provisioner that dynamically and intelligently manages storage in Kubernetes environments. By integrating Trident with OpenShift, storage demands can be automatically fulfilled without the need for manual intervention. This ensures easy provisioning of persistent storage for containerized workloads.</p>

<h4 id="integration-in-data-centers-and-the-cloud">Integration in Data Centers and the Cloud</h4>

<p>NetApp Trident plays a pivotal role in orchestrating data both <strong>on-premises in data centers</strong> and in the <strong>cloud</strong>. This flexibility allows businesses to take advantage of hybrid infrastructures, where workloads can be dynamically shifted between local data centers and the cloud. This ensures efficient resource utilization, cost optimization, and secure, reliable data availability.</p>

<p>Through integration with cloud providers (hyperscalers) like AWS, Microsoft Azure, and Google Cloud, Trident guarantees a consistent storage solution, enabling containerized applications to run with the same performance and security standards both locally and in the cloud. This supports the vision of <strong>cloud-native</strong> and <strong>hybrid-cloud architectures</strong>, offering maximum flexibility without compromising data security or performance.</p>

<h4 id="data-management-and-protection">Data Management and Protection</h4>

<p>Beyond storage, Trident places a strong emphasis on <strong>data management and protection</strong>. With features like snapshots and replication, organizations can create backups of their data at any time and restore them quickly in case of failure. This is crucial for ensuring data availability and resilience in high-critical production environments.</p>

<p>Additionally, NetApp Trident provides seamless <strong>backup and disaster recovery solutions</strong>, which can be leveraged both on-premises in data centers and in the cloud. Data can be automatically backed up and replicated across different geographical regions, minimizing downtime and meeting strict SLA requirements.</p>

<h4 id="data-integration-and-security">Data Integration and Security</h4>

<p>NetApp Trident not only simplifies storage provisioning but also supports seamless <strong>data integration</strong> across different environments, whether in data centers or the cloud. Its flexible architecture allows data to move effortlessly across hybrid and multi-cloud infrastructures, ensuring applications have consistent and reliable access to data, regardless of location.</p>

<p>In terms of <strong>data security</strong>, Trident offers comprehensive mechanisms for data encryption, both at rest and in transit. This ensures that sensitive data remains protected from unauthorized access. Combined with OpenShift’s native security features, this creates a robust environment that meets the stringent demands of data protection and compliance.</p>

<h3 id="gitops-automation-at-its-best">GitOps: Automation at Its Best</h3>

<p><strong>GitOps</strong> adds an additional layer of efficiency to this combination. With GitOps, configuration changes and infrastructure updates are managed via pull requests and version control in a Git repository. This makes the entire DevOps process versionable, traceable, and automated. When OpenShift and NetApp Trident are integrated into a GitOps pipeline, the benefits are clear: infrastructure and storage are defined as code, changes are automatically validated, and rolled out into production–all through a single, verifiable source.</p>

<h3 id="conclusion">Conclusion</h3>

<p>The combination of OpenShift, NetApp Trident, and GitOps provides a highly automated, scalable, and secure environment that orchestrates data both in the data center and in the cloud. This forms the foundation for orchestrating excellence in IT infrastructure, meeting the modern demands of applications regarding data management, security, and availability.</p>

<p>In the next post, I’ll dive deeper into practical examples and real-world use cases to see how this integration works in action. Stay tuned!</p>]]></content><author><name>Fabian Born</name><email>blog@fabianborn.net</email></author><category term="inspiration" /><category term="Kubernetes" /><category term="NetApp" /><category term="OpenShift" /><category term="Trident" /><summary type="html"><![CDATA[title: “Orchestrating Excellence” date: 2024-09-06 draft: false categories: blog tags: [“NetApp”,”Kubernetes”,”Trident”,”DevOps”,”Backup”] banner: /assets/images/content/orchexcell.jpg […]]]></summary></entry><entry><title type="html">Astra Connector (deprecated)</title><link href="https://fabianborn.net/2024/07/astra-connector-deprecated/" rel="alternate" type="text/html" title="Astra Connector (deprecated)" /><published>2024-07-14T00:00:00+00:00</published><updated>2024-07-14T00:00:00+00:00</updated><id>https://fabianborn.net/2024/07/astra-connector-deprecated</id><content type="html" xml:base="https://fabianborn.net/2024/07/astra-connector-deprecated/"><![CDATA[<hr />

<h2 id="requirements">Requirements</h2>

<h4 id="update-trident-activate-acp-install-astra-connector">Update Trident, activate ACP, install Astra Connector</h4>

<p>The prerequisite is a current Trident (version 24.02). Depending on which version is currently on the cluster, this may need to be updated (e.g. if deployed via Helm: helm upgrade trident -n trident netapp-trident/trident-operator).</p>

<p>Then the ACP (Astra Control Provisioner) mode of Trident is activated, this enables the integration between Astra Control and Trident. Checkout the <a href="https://docs.netapp.com/us-en/astra-control-center/get-started/enable-acp.html">ACP documentation</a> to install ACP!</p>

<p>Astra Connector must be installed in the Kubernetes cluster. I will describe how exactly in a new post. Until then, have a look at the <a href="https://github.com/netapp/astra-connector-operator">official documentation</a> .</p>

<h3 id="applications">Applications</h3>

<h4 id="snapshots--backup">Snapshots &amp; Backup</h4>

<p>First, you need the object store on which backups and metadata (also for snapshots) are stored. Here in the example for an Ontap-S3, for StorageGrid simply change the providerType to “storagegrid-s3”. In addition, change the “name” if necessary (if several buckets are used, you can differentiate between them using this field). Also adjust the “endpoint” and “bucketName”:</p>

<div class="language-yaml highlighter-rouge"><div class="highlight"><pre class="highlight"><code><span class="na">apiVersion</span><span class="pi">:</span> <span class="s">v1</span>
<span class="na">kind</span><span class="pi">:</span> <span class="s">Secret</span>
<span class="na">metadata</span><span class="pi">:</span>
  <span class="na">name</span><span class="pi">:</span> <span class="s">s3-creds</span>
  <span class="na">namespace</span><span class="pi">:</span> <span class="s">astra-connector</span>
<span class="na">type</span><span class="pi">:</span> <span class="s">Opaque</span>
<span class="na">stringData</span><span class="pi">:</span>
  <span class="na">accessKeyID</span><span class="pi">:</span> <span class="s">&lt;S3 access key&gt;</span>
  <span class="na">secretAccessKey</span><span class="pi">:</span> <span class="s">&lt;S3 secret key&gt;</span>
<span class="nn">---</span>
<span class="na">apiVersion</span><span class="pi">:</span> <span class="s">astra.netapp.io/v1</span>
<span class="na">kind</span><span class="pi">:</span> <span class="s">AppVault</span>
<span class="na">metadata</span><span class="pi">:</span>
  <span class="na">name</span><span class="pi">:</span> <span class="s">my-appvault</span>
  <span class="na">namespace</span><span class="pi">:</span> <span class="s">astra-connector</span>
<span class="na">spec</span><span class="pi">:</span>
  <span class="na">providerType</span><span class="pi">:</span> <span class="s">ontap-s3</span>
  <span class="na">providerConfig</span><span class="pi">:</span>
    <span class="na">endpoint</span><span class="pi">:</span> <span class="s">s3.company.org</span>
    <span class="na">bucketName</span><span class="pi">:</span> <span class="s">astra</span>
    <span class="na">skipCertValidation</span><span class="pi">:</span> <span class="s2">"</span><span class="s">true"</span>
  <span class="na">providerCredentials</span><span class="pi">:</span>
    <span class="na">accessKeyID</span><span class="pi">:</span>
      <span class="na">valueFromSecret</span><span class="pi">:</span>
        <span class="na">name</span><span class="pi">:</span> <span class="s">s3-creds</span>
        <span class="na">key</span><span class="pi">:</span> <span class="s">accessKeyID</span>
    <span class="na">secretAccessKey</span><span class="pi">:</span>
      <span class="na">valueFromSecret</span><span class="pi">:</span>
        <span class="na">name</span><span class="pi">:</span> <span class="s">s3-creds</span>
        <span class="na">key</span><span class="pi">:</span> <span class="s">secretAccessKey</span>
</code></pre></div></div>

<p>Now you can define applications (i.e. what should be saved together), here the “standard case”, an app corresponds to a namespace. Simply adjust “name” and “namespace”:</p>

<div class="language-yaml highlighter-rouge"><div class="highlight"><pre class="highlight"><code><span class="na">apiVersion</span><span class="pi">:</span> <span class="s">astra.netapp.io/v1</span>
<span class="na">kind</span><span class="pi">:</span> <span class="s">Application</span>
<span class="na">metadata</span><span class="pi">:</span>
  <span class="na">name</span><span class="pi">:</span> <span class="s">wordpress</span>
  <span class="na">namespace</span><span class="pi">:</span> <span class="s">astra-connector</span>
<span class="na">spec</span><span class="pi">:</span>
  <span class="na">includedNamespaces</span><span class="pi">:</span>
    <span class="pi">-</span> <span class="na">namespace</span><span class="pi">:</span> <span class="s">wordpress</span>
</code></pre></div></div>

<p>Now you can take a snapshot. To do this, adjust “applicationRef” to the app name of the YAML above and, if necessary, the appVaultRef (if you have named it differently). Then check the status with <code class="language-plaintext highlighter-rouge">kubectl get snapshot -n astra-connector</code></p>

<div class="language-yaml highlighter-rouge"><div class="highlight"><pre class="highlight"><code><span class="na">apiVersion</span><span class="pi">:</span> <span class="s">astra.netapp.io/v1</span>
<span class="na">kind</span><span class="pi">:</span> <span class="s">Snapshot</span>
<span class="na">metadata</span><span class="pi">:</span>
  <span class="na">name</span><span class="pi">:</span> <span class="s">snap1</span>
  <span class="na">namespace</span><span class="pi">:</span> <span class="s">astra-connector</span>
<span class="na">spec</span><span class="pi">:</span>
  <span class="na">applicationRef</span><span class="pi">:</span> <span class="s">wordpress</span>
  <span class="na">appVaultRef</span><span class="pi">:</span> <span class="s">my-appvault</span>
</code></pre></div></div>

<p>Very similar for a backup:</p>

<div class="language-yaml highlighter-rouge"><div class="highlight"><pre class="highlight"><code><span class="na">apiVersion</span><span class="pi">:</span> <span class="s">astra.netapp.io/v1</span>
<span class="na">kind</span><span class="pi">:</span> <span class="s">Backup</span>
<span class="na">metadata</span><span class="pi">:</span>
  <span class="na">name</span><span class="pi">:</span> <span class="s">bkp1</span>
  <span class="na">namespace</span><span class="pi">:</span> <span class="s">astra-connector</span>
<span class="na">spec</span><span class="pi">:</span>
  <span class="na">applicationRef</span><span class="pi">:</span> <span class="s">wordpress</span>
  <span class="na">appVaultRef</span><span class="pi">:</span> <span class="s">my-appvault</span>
</code></pre></div></div>

<p>And the best way to do this is of course to set it up as a schedule:</p>

<div class="language-yaml highlighter-rouge"><div class="highlight"><pre class="highlight"><code><span class="na">apiVersion</span><span class="pi">:</span> <span class="s">astra.netapp.io/v1</span>
<span class="na">kind</span><span class="pi">:</span> <span class="s">Schedule</span>
<span class="na">metadata</span><span class="pi">:</span>
  <span class="na">name</span><span class="pi">:</span> <span class="s">sched</span>
  <span class="na">namespace</span><span class="pi">:</span> <span class="s">astra-connector</span>
<span class="na">spec</span><span class="pi">:</span>
  <span class="na">applicationRef</span><span class="pi">:</span> <span class="s">wordpress</span>
  <span class="na">appVaultRef</span><span class="pi">:</span> <span class="s">my-appvault</span>
  <span class="na">backupRetention</span><span class="pi">:</span> <span class="s2">"</span><span class="s">2"</span>
  <span class="na">snapshotRetention</span><span class="pi">:</span> <span class="s2">"</span><span class="s">1"</span>
  <span class="na">granularity</span><span class="pi">:</span> <span class="s">hourly</span>
  <span class="na">minute</span><span class="pi">:</span> <span class="s2">"</span><span class="s">10"</span>
</code></pre></div></div>

<h4 id="restore-application">Restore Application</h4>

<p>Backup without restore would be kind of stupid… To do this, determine the backup path and use:</p>

<div class="language-shell highlighter-rouge"><div class="highlight"><pre class="highlight"><code>kubectl <span class="nt">-n</span> astra-connector get backup bkp1 <span class="nt">-o</span><span class="o">=</span><span class="nv">jsonpath</span><span class="o">=</span><span class="s1">'{.status.appArchivePath}'</span>
</code></pre></div></div>

<p>Now you can restore your application!</p>

<div class="language-yaml highlighter-rouge"><div class="highlight"><pre class="highlight"><code><span class="na">apiVersion</span><span class="pi">:</span> <span class="s">astra.netapp.io/v1</span>
<span class="na">kind</span><span class="pi">:</span> <span class="s">BackupInplaceRestore</span>
<span class="na">metadata</span><span class="pi">:</span>
  <span class="na">name</span><span class="pi">:</span> <span class="s">bkprestore-to-wordpress</span>
  <span class="na">namespace</span><span class="pi">:</span> <span class="s">astra-connector</span>
<span class="na">spec</span><span class="pi">:</span>
  <span class="na">appVaultRef</span><span class="pi">:</span> <span class="s">my-appvault</span>
  <span class="na">appArchivePath</span><span class="pi">:</span> <span class="s">&lt;path&gt;</span>
</code></pre></div></div>]]></content><author><name>Fabian Born</name><email>blog@fabianborn.net</email></author><category term="howto" /><category term="backup" /><category term="Kubernetes" /><category term="NetApp" /><category term="Trident" /><summary type="html"><![CDATA[Requirements Update Trident, activate ACP, install Astra Connector The prerequisite is a current […]]]></summary></entry></feed>