NFS Exports on Amazon FSx for NetApp ONTAP
Part 1 covered SMB shares on Amazon FSx for NetApp ONTAP (FSxN) and the building blocks behind them. This part looks at the same structure from the Linux side: NFS exports, the mechanics of export policies, and the question of why a mount ends in “Permission denied” despite an apparently flawless configuration. Snapshots and SnapVault round out the picture.
All examples use the ONTAP CLI. Simultaneous access to the same data set over both protocols is reserved for part 3.
Reference architecture
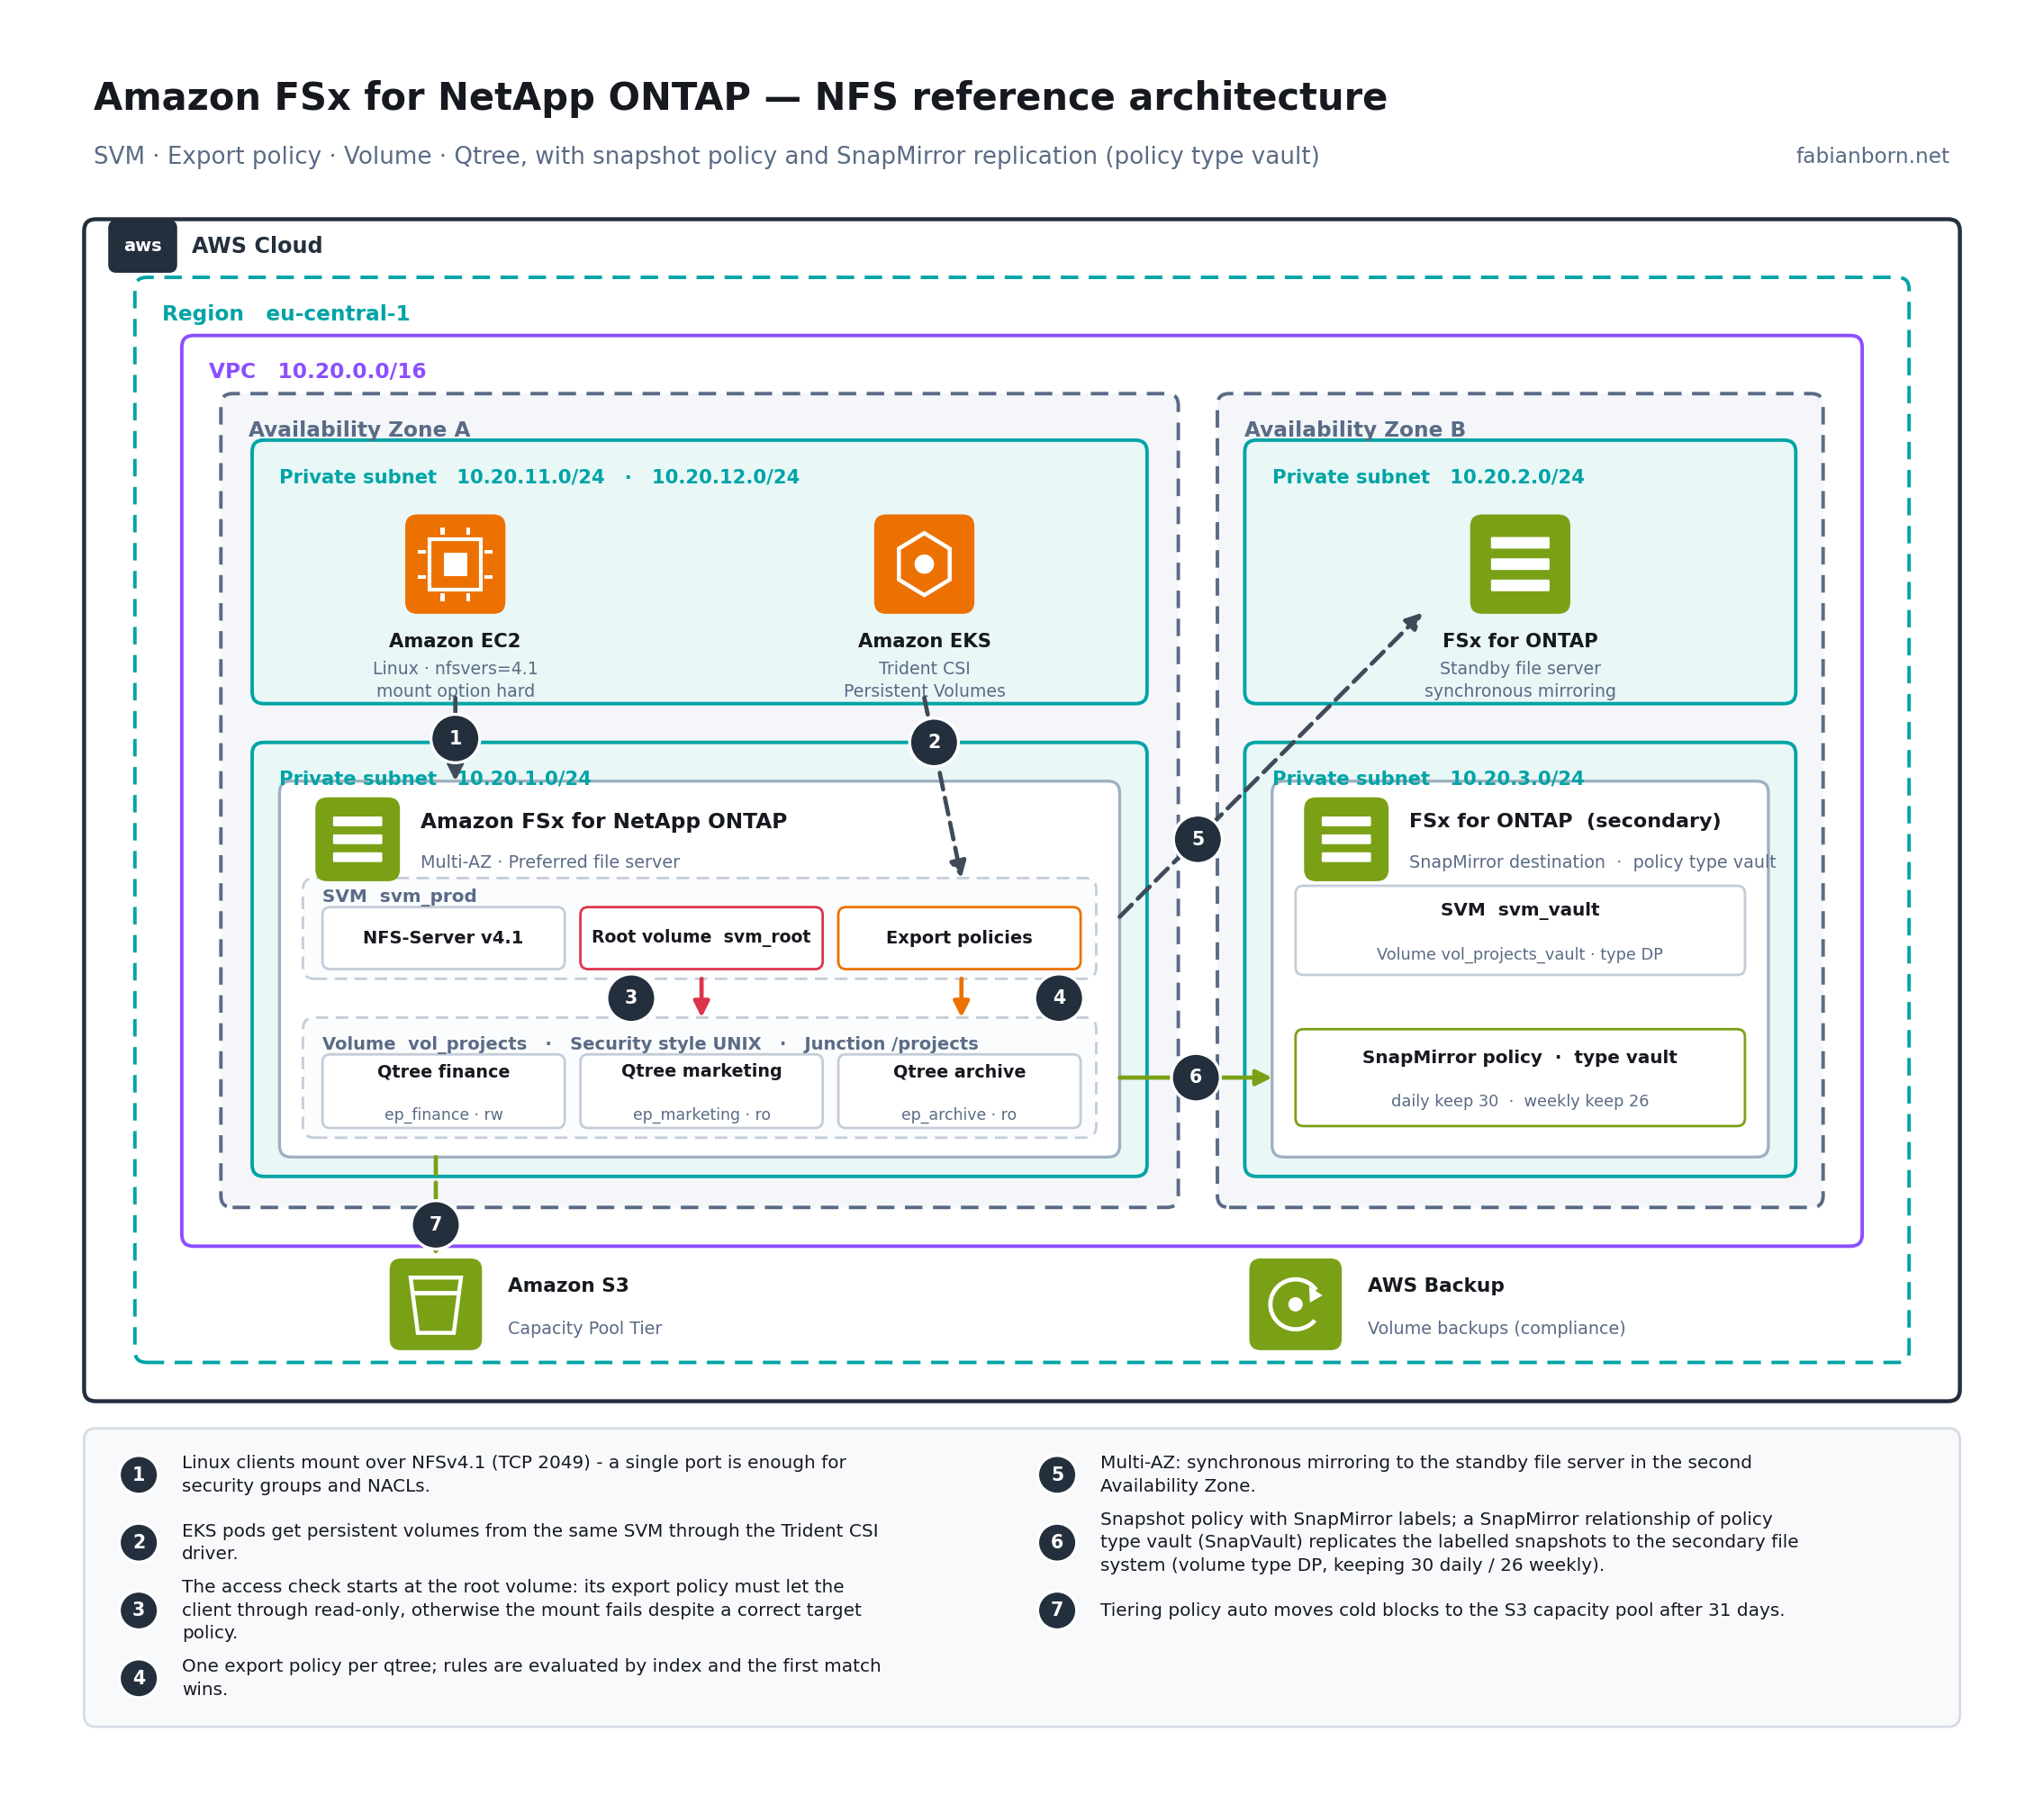
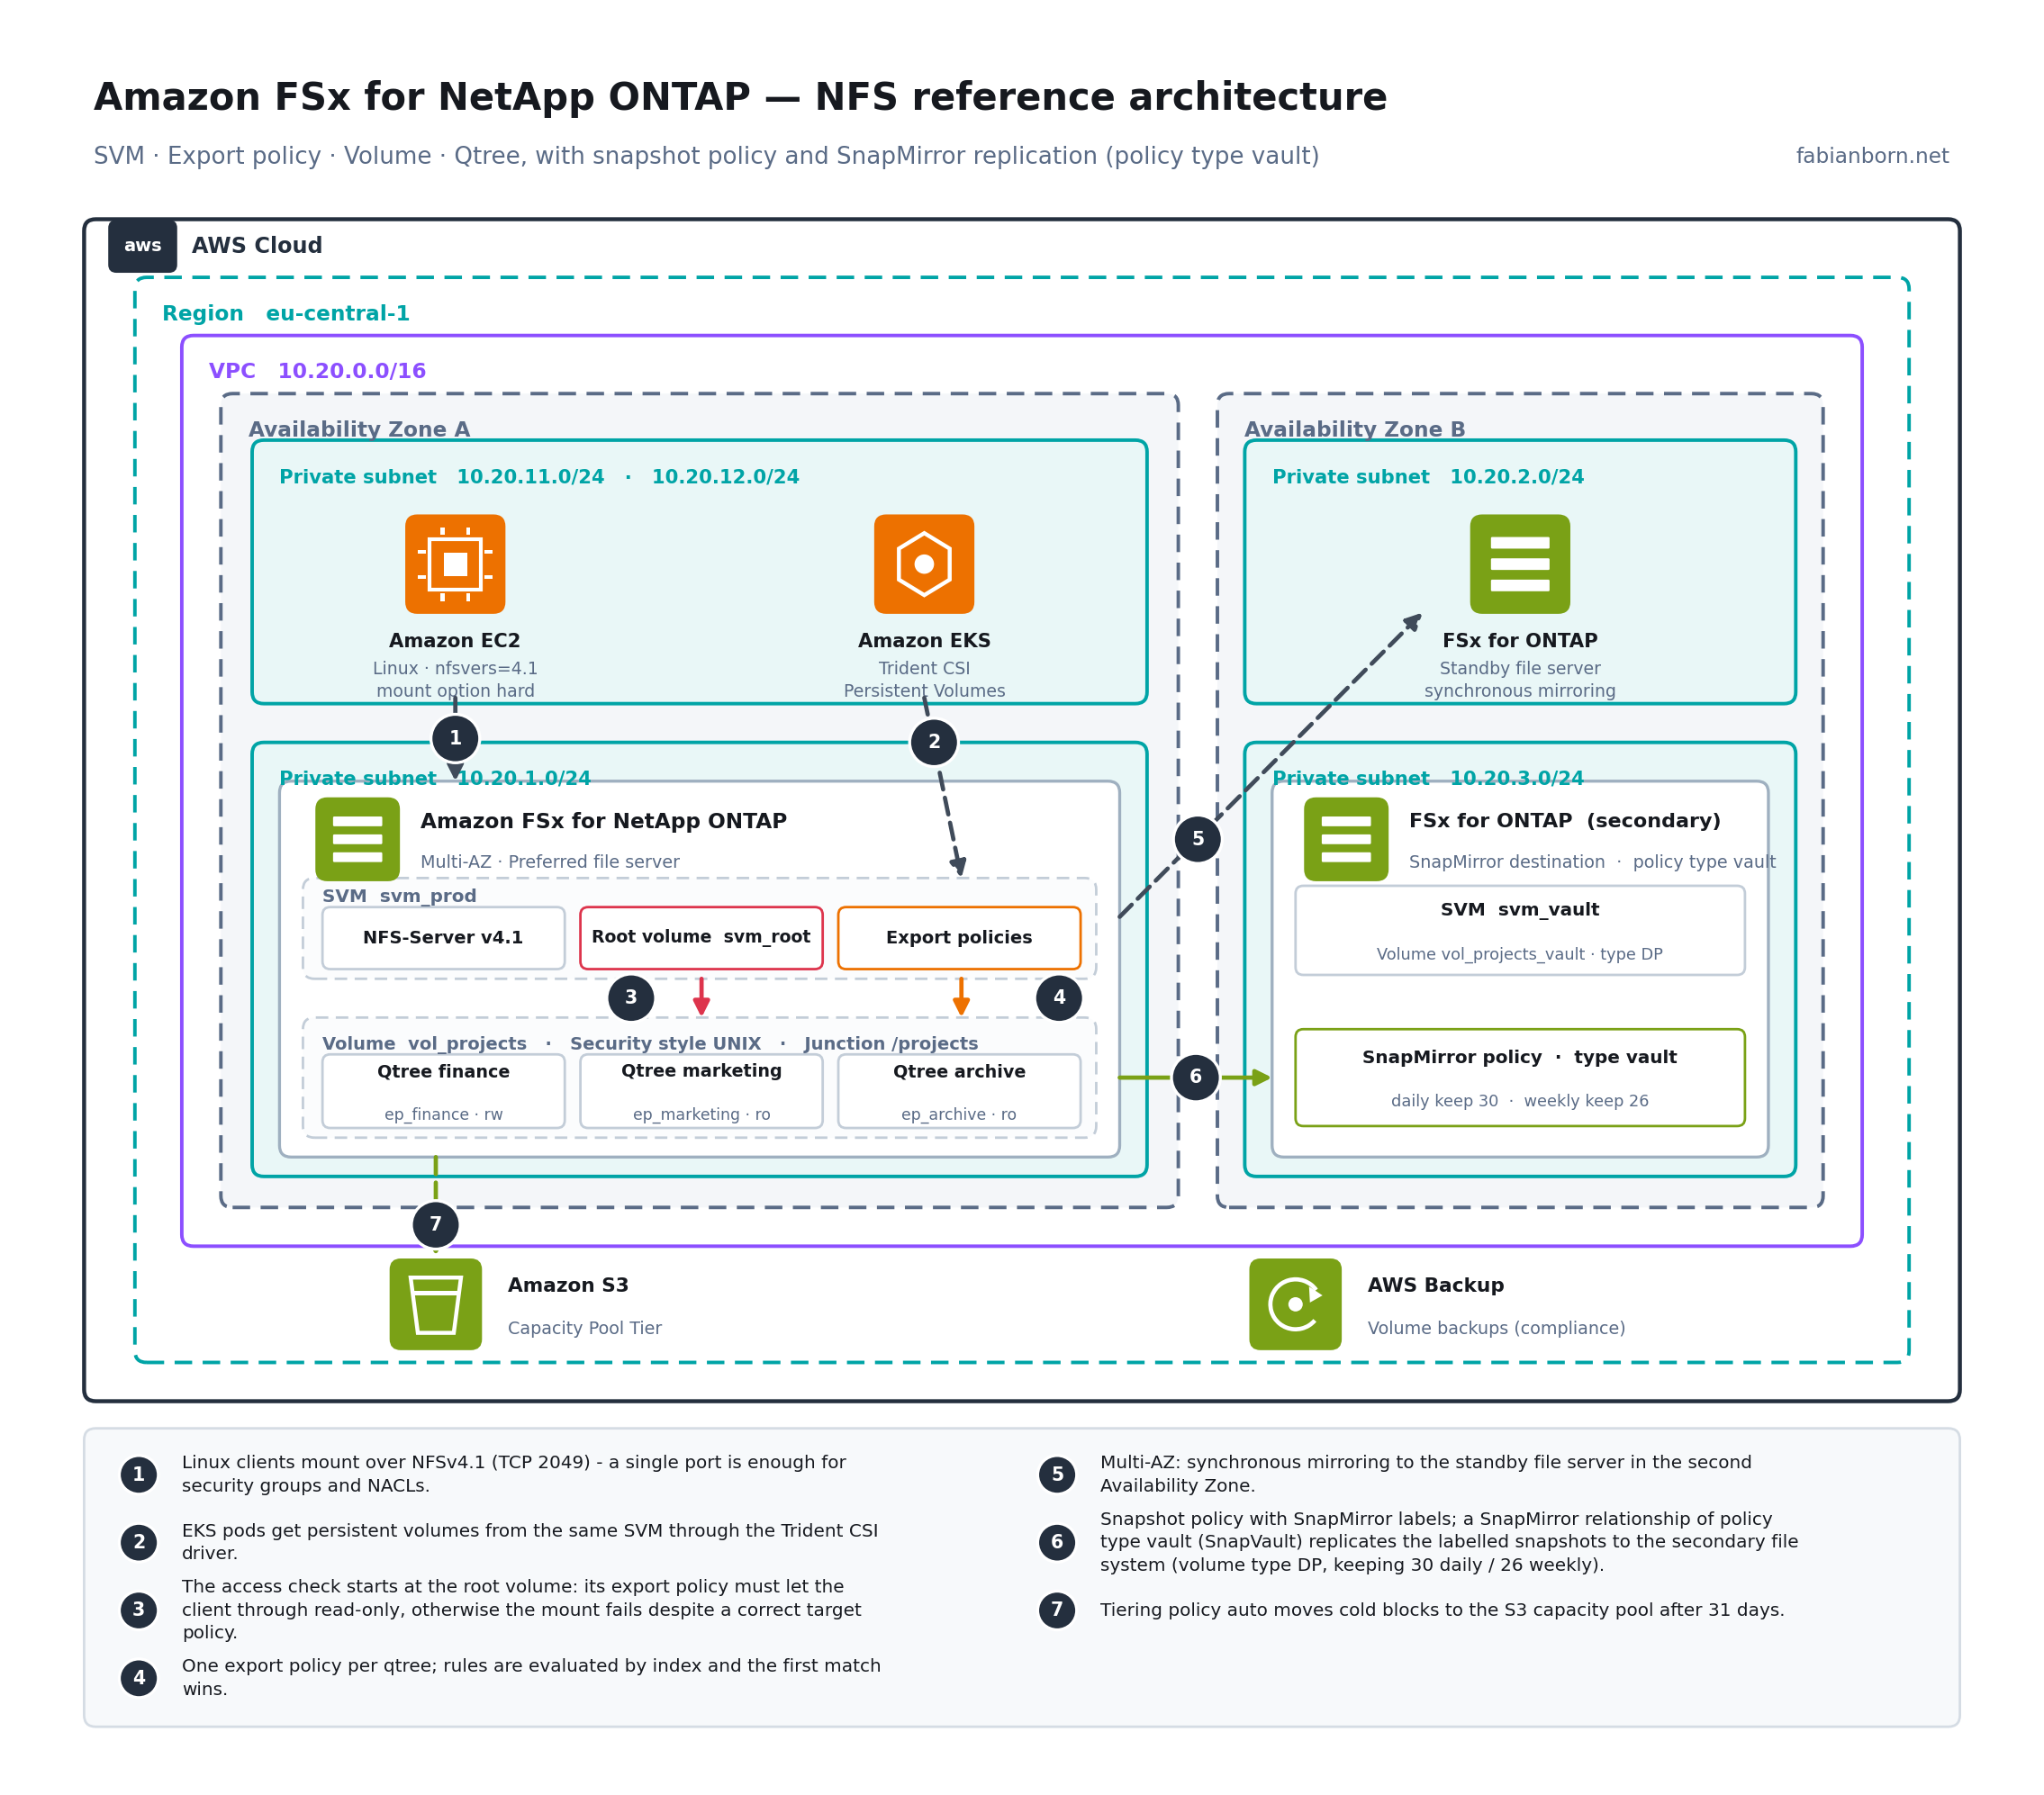
Linux and EKS clients reach qtrees over NFSv4.1, each qtree carrying its own export policy. Access is checked along the namespace — starting at the SVM’s root volume.
1. The building blocks in brief
For anyone joining here, the short version from part 1:
| Object | Role | Relevance for NFS |
|---|---|---|
| SVM | Standalone file server with LIFs, DNS name and its own NFS server | Tenancy boundary; export policies are per SVM |
| Volume | Unit of capacity, snapshots, tiering, SnapMirror; mounted via junction path | Carries an export policy and the snapshot policy |
| Qtree | Logical container in a volume, up to 4,995 per volume with tailored permissions and security styles | Carries its own export policy |
For NFS workloads the security style is almost always UNIX. A volume passes it down to its qtrees, but it can still be overridden there:
FsxId0123456789abcdef0::> volume create -vserver svm_prod -volume vol_app \
    -aggregate aggr1 -size 1TB -security-style unix \
    -junction-path /app -policy default \
    -snapshot-policy sp_appdata -percent-snapshot-space 10

FsxId0123456789abcdef0::> volume qtree create -vserver svm_prod \
    -volume vol_app -qtree logs -security-style unix -unix-permissions 0770
A sizing note that applies here as well: the service limit is 500 volumes per file system. Separating workloads through qtrees rather than volumes sidesteps that ceiling and removes the need for a limit increase. The flip side: the snapshot schedule and the SnapMirror relationship apply to the whole volume. Different retention requirements need their own volume.
2. Namespace inheritance — the most common source of failure
Every SVM owns a root volume that spans the namespace and holds the SVM metadata. FSxN automatically creates an export policy named default for it — and that same policy is applied to every newly created data volume.
From this follows the single most important rule in this post: an NFS client must be able to traverse the entire path from the namespace root down to the target. If the root volume’s policy does not let the client through at least read-only, the mount fails — even when the target volume’s policy is immaculate.
The clean pattern: root volume readable, writable nowhere.
FsxId0123456789abcdef0::> vserver export-policy rule create -vserver svm_prod \
    -policyname default -ruleindex 10 \
    -clientmatch 10.20.0.0/16 -rorule sys -rwrule never \
    -superuser none -protocol nfs
A look at the namespace belongs before every go-live:
FsxId0123456789abcdef0::> volume show -vserver svm_prod \
    -fields junction-path,policy,security-style
A volume without a junction path is invisible to clients, regardless of any policy.
3. The export policy model
NFS has no share object. Export policies control access instead: a policy and its rules determine which clients may reach volumes and exports. By default export policies apply to NFS, and they can optionally be enabled for SMB clients as well — unnecessary in a pure Windows environment, a useful extra net in mixed ones.
A policy is bound to a volume or a qtree. The rules inside a policy are evaluated by index, and the first matching rule wins — later rules are not considered.
This is the second most common configuration error after the forgotten root policy: a broad 0.0.0.0/0 rule at index 1 renders every more specific rule behind it irrelevant. So always index from specific to general, and leave gaps between indices (10, 20, 30) so something can be slotted in later.
4. Creating policies and rules
FsxId0123456789abcdef0::> vserver export-policy create -vserver svm_prod \
    -policyname ep_app_tier

FsxId0123456789abcdef0::> vserver export-policy rule create -vserver svm_prod \
    -policyname ep_app_tier -ruleindex 10 \
    -clientmatch 10.20.11.0/24 \
    -rorule sys -rwrule sys -superuser none -anon 65534 \
    -protocol nfs4

FsxId0123456789abcdef0::> vserver export-policy rule create -vserver svm_prod \
    -policyname ep_app_tier -ruleindex 20 \
    -clientmatch 10.20.12.0/24 \
    -rorule sys -rwrule never -superuser none -anon 65534 \
    -protocol nfs4
The parameters one by one:
clientmatch— the client specification. Valid values are IP addresses, IP addresses with a subnet mask or a network mask, netgroup names prefixed with@, domain names prefixed with a period, and host names. In AWS environments CIDR notation is the normal case, since instances draw their addresses from defined subnets anyway. Avoid host names — they make access control depend on DNS availability.rorule/rwrule— which authentication method grants read or write access.sysfor classic AUTH_SYS,krb5/krb5i/krb5pfor Kerberos,neverfor a blanket denial,anyfor “don’t care” (to be avoided).superuser— whetherrooton the client is passed through asroot. The default and the recommendation isnone: root is then mapped toanon(root squashing). Set it tosysonly where an application demonstrably needs it — container runtimes that have to set ownership, for instance.anon— the UID that unmapped access falls back to.65534(nobody) is the safe choice;0is the exact opposite.protocol— restriction tonfs3,nfs4or both. Setting it explicitly beats trusting the default.
Reviewing rules:
FsxId0123456789abcdef0::> vserver export-policy rule show -vserver svm_prod \
    -policyname ep_app_tier
5. Assigning a policy — volume or qtree
At the volume level:
FsxId0123456789abcdef0::> volume modify -vserver svm_prod -volume vol_app \
    -policy ep_app_tier
At the qtree level — this is where fine-grained separation inside one volume takes effect:
FsxId0123456789abcdef0::> volume qtree modify -vserver svm_prod \
    -volume vol_projects -qtree finance -export-policy ep_finance

FsxId0123456789abcdef0::> volume qtree modify -vserver svm_prod \
    -volume vol_projects -qtree marketing -export-policy ep_marketing
Two departments then share a volume — and therefore the snapshot schedule and tiering policy — while having entirely separate access rules. This pattern is exactly what makes qtrees so valuable in multi-tenant environments.
An overview of which policy applies where:
FsxId0123456789abcdef0::> volume qtree show -vserver svm_prod \
    -fields export-policy,security-style
6. NFSv3 or NFSv4.1
FsxId0123456789abcdef0::> vserver nfs show -vserver svm_prod -fields v3,v4.1,v4-id-domain
FsxId0123456789abcdef0::> vserver nfs modify -vserver svm_prod \
    -v4.1 enabled -v4-id-domain corp.example.com
The differences that matter operationally:
| NFSv3 | NFSv4.1 | |
|---|---|---|
| Permissions | Mode bits | Plus NFSv4 ACLs |
| User identity | Numeric UID/GID | Name@Domain |
| Statefulness | Stateless | Stateful, locking inside the protocol |
| Firewall ports | portmapper, mountd, nlm | 2049 only |
showmount -e |
Works | Returns no export list |
NFSv4.1 is the better choice in AWS environments — a single port simplifies security groups and NACLs considerably, locking is cleaner, and the ACLs do more than mode bits.
The price: the ID domain must be set identically on server and clients, otherwise every access lands on nobody:nobody. On the client that lives in /etc/idmapd.conf:
[General]
Domain = corp.example.com
If you use showmount -e in scripts or monitoring, know this before you switch — under NFSv4.1 it no longer returns an export list.
7. Mounting on the client
mount -t nfs \
  -o nfsvers=4.1,rsize=262144,wsize=262144,hard,timeo=600,retrans=2,_netdev \
  svm_prod.fs-0123456789abcdef0.fsx.eu-central-1.amazonaws.com:/app \
  /mnt/app
About the options:
hardrather thansoft— during a storage failover, I/O waits instead of returning errors to the application. In a Multi-AZ deployment that is exactly the desired behaviour;softproduces data corruption rather than a short delay.rsize/wsizeat 256 KiB suit typical sequential workloads.timeo=600, retrans=2— the recommended combination for NFS over TCP._netdevavoids boot problems when the mount sits in/etc/fstab.
For /etc/fstab:
svm_prod.fs-0123456789abcdef0.fsx.eu-central-1.amazonaws.com:/app /mnt/app nfs nfsvers=4.1,rsize=262144,wsize=262144,hard,timeo=600,retrans=2,_netdev 0 0
8. Snapshots and backup
Under NFS too, data protection is a property of the volume rather than an additional component.
Defining a snapshot policy
A snapshot policy bundles several schedules, each with its own retention. The SnapMirror labels are the crucial part — without them a vault relationship cannot later pick out which snapshots to replicate:
FsxId0123456789abcdef0::> snapshot policy create -vserver svm_prod \
    -policy sp_appdata -enabled true \
    -schedule1 hourly -count1 12 -snapmirror-label1 hourly \
    -schedule2 daily  -count2 14 -snapmirror-label2 daily \
    -schedule3 weekly -count3 8  -snapmirror-label3 weekly

FsxId0123456789abcdef0::> volume modify -vserver svm_prod -volume vol_app \
    -snapshot-policy sp_appdata -percent-snapshot-space 10
With application data, consistency deserves a second thought: a volume snapshot is crash-consistent, not application-consistent. Databases and transactional workloads need a pre/post script that quiesces the application before the snapshot — or an integration such as SnapCenter.
Making snapshots visible to NFS clients
Unlike SMB there is no Previous Versions dialog. Instead ONTAP exposes a .snapshot directory:
FsxId0123456789abcdef0::> volume modify -vserver svm_prod -volume vol_app \
    -snapdir-access true
Users can then retrieve what they deleted themselves:
ls /mnt/app/.snapshot/
cp /mnt/app/.snapshot/daily.2026-09-19_0010/config/app.yaml /mnt/app/config/app.yaml
The directory is read-only and does not show up in ls -la. For scripts that walk the tree this is occasionally a trap — backup agents and du runs should exclude it explicitly.
Restore at the storage layer
# Bring a single file back from a snapshot
FsxId0123456789abcdef0::> volume snapshot restore-file -vserver svm_prod \
    -volume vol_app -snapshot daily.2026-09-19_0010 \
    -path /config/app.yaml

# Roll the entire volume back to a snapshot
FsxId0123456789abcdef0::> volume snapshot restore -vserver svm_prod \
    -volume vol_app -snapshot daily.2026-09-19_0010
The second command discards every change since the snapshot and deletes newer snapshots of the volume. It belongs in a documented procedure with four-eyes approval, not in day-to-day work.
SnapVault: SnapMirror with policy type vault
Snapshots live in the same volume as the production data. They are excellent against accidental deletion — and useless against the loss of the file system itself. That is what SnapVault is for: snapshots are transferred to a second FSxN file system and kept there longer than on the source.
First a clarification, because this regularly gets muddled: SnapVault is not a separate technology, it is a SnapMirror relationship whose policy carries the type vault. There is exactly one SnapMirror engine; the policy type determines the behaviour:
| Policy type | Behaviour | Typical use |
|---|---|---|
async-mirror |
The destination is a 1:1 copy of the source including its snapshot set | Disaster recovery, failover |
vault |
Only the snapshots selected via SnapMirror labels, with their own retention at the destination | Backup, long-term retention |
mirror-vault |
Both in a single relationship | DR and backup on the same destination |
That is why every command in this section reads snapmirror ..., even where people colloquially say SnapVault. For long-term retention vault is the right type: it does not mirror the current state, it accumulates labelled recovery points.
The configuration follows a fixed order. The FSxN file systems must be peered first so they can replicate to each other, then the participating SVMs. The destination volume is created with volume type DP — that type is mandatory for a replication target. Next comes a SnapMirror policy of type vault whose rules use the SnapMirror label to control which snapshots are replicated and how long they are kept at the destination. Finally the relationship is created and initialised, with the first run transferring the complete source data.
Step 1 — peering (once per file system pair, at cluster and SVM level):
FsxId0123456789abcdef0::> cluster peer create -address-family ipv4 \
    -peer-addrs 10.30.1.10,10.30.2.10

FsxId0123456789abcdef0::> vserver peer create -vserver svm_prod \
    -peer-vserver svm_vault -peer-cluster FsxIdfedcba9876543210f \
    -applications snapmirror
Step 2 — destination volume of type DP (on the secondary file system):
FsxIdfedcba9876543210f::> volume create -vserver svm_vault \
    -volume vol_app_vault -aggregate aggr1 -size 1.5TB -type DP
Step 3 — SnapMirror policy of type vault with label rules:
FsxIdfedcba9876543210f::> snapmirror policy create -vserver svm_vault \
    -policy pol_vault_appdata -type vault

FsxIdfedcba9876543210f::> snapmirror policy add-rule -vserver svm_vault \
    -policy pol_vault_appdata -snapmirror-label daily -keep 30

FsxIdfedcba9876543210f::> snapmirror policy add-rule -vserver svm_vault \
    -policy pol_vault_appdata -snapmirror-label weekly -keep 26
The labels come from the snapshot policy above. The destination therefore holds 30 daily and 26 weekly states — roughly half a year of retention — while the source keeps only 14 and 8.
Step 4 — create and initialise the relationship:
FsxIdfedcba9876543210f::> snapmirror create \
    -source-path svm_prod:vol_app \
    -destination-path svm_vault:vol_app_vault \
    -policy pol_vault_appdata -schedule daily

FsxIdfedcba9876543210f::> snapmirror initialize \
    -destination-path svm_vault:vol_app_vault
Operational monitoring:
FsxIdfedcba9876543210f::> snapmirror show -destination-path svm_vault:vol_app_vault
FsxIdfedcba9876543210f::> snapmirror show -fields state,status,lag-time,last-transfer-size
The lag-time field belongs in your monitoring. If it grows beyond the transfer interval, replication is falling behind the change rate.
One detail that is easily overlooked with NFS destination volumes: a volume of type DP has no junction path and no export policy. If you want to read data straight from the vault, you first have to mount the destination volume into the namespace and give it a restrictive export policy — usually read-only for a single, tightly scoped admin host.
How this differs from AWS Backup
SnapMirror, policy type vault |
AWS Backup | |
|---|---|---|
| Granularity | Single file from any snapshot | Volume restore |
| Retention | Freely defined through policy rules | Through the backup plan |
| Destination | Second FSxN file system | AWS-managed backup vault |
| Integration | ONTAP-native, label-driven | AWS console, tags, Organizations |
| Typical use | Operational restore, long-term states | Compliance, cross-account retention |
In regulated environments you often see both: the vault relationship for fast operational restores, AWS Backup for audit-proof retention outside the storage stack.
9. Day-to-day administration
Checking access before the user calls
The most useful command in the entire NFS space — it answers precisely the question that otherwise gets answered by guesswork:
FsxId0123456789abcdef0::> vserver export-policy check-access -vserver svm_prod \
    -volume vol_app -client-ip 10.20.11.15 \
    -authentication-method sys -protocol nfs4 -access-type read-write
The output lists every path component from the namespace root to the target, with the policy that applies, the rule index and the result. If the root entry says denied, you have found the cause in seconds — and it is the case from section 2.
Connected clients
FsxId0123456789abcdef0::> vserver nfs connected-clients show -vserver svm_prod
FsxId0123456789abcdef0::> vserver nfs connected-clients show -vserver svm_prod \
    -fields client-ip,protocol,volume,local-request-count
Locks
FsxId0123456789abcdef0::> vserver locks show -vserver svm_prod -volume vol_app
Stale locks after a client crash are rarer under NFSv4.1 than under v3, but they happen. Before breaking a lock, always confirm the client is really gone.
Capacity per qtree
Tree quotas apply at the storage layer and therefore independently of the protocol — the configuration is identical to part 1:
FsxId0123456789abcdef0::> volume quota policy rule create -vserver svm_prod \
    -policy-name default -volume vol_projects \
    -type tree -target finance -disk-limit 500GB -threshold 450GB

FsxId0123456789abcdef0::> volume quota resize -vserver svm_prod -volume vol_projects
FsxId0123456789abcdef0::> volume quota report -vserver svm_prod -volume vol_projects
Worth noting: the snapshot reserve does not count against the tree quota. A volume can fill up through snapshots while every quota is formally respected — which is why size-used-by-snapshots belongs in your monitoring just as much as the quota report.
10. Best practices in brief
- Set the root volume policy to read-only and make it the first thing you check in any failure analysis.
- Index rules from specific to general, leaving gaps (10, 20, 30).
superuser noneas the default; justify and document every exception.anon 65534, never0.- Set
protocolexplicitly rather than trusting the default. - CIDR ranges instead of host names in
clientmatch. - Prefer NFSv4.1, keeping the ID domain identical on server and clients.
- Mount
hardso failover events do not surface as I/O errors. - Assign SnapMirror labels from day one, even if the vault relationship comes later.
- Expose or hide
.snapshotdeliberately — and exclude it from backup agents. - One policy per workload, rather than extending the
defaultpolicy. check-accessbefore go-live, not during the incident.
Conclusion and what’s next
Export policies are more powerful than an /etc/exports, but they demand an understanding of two things: inheritance along the namespace, and evaluation by rule index. Once both have sunk in, most NFS problems on FSxN are solved with a single command. Snapshots and SnapVault come along without any additional backup infrastructure — and cover most requirements, from self-service restore to half a year of retention.
Part 3 takes on the case the first two parts deliberately set aside: the same data set, used over SMB and NFS at once. Security style as the authority, name mapping between AD and UNIX identities, LDAP integration, and the traps that come with it. </content>