Mounting FSxN NFS Volumes Straight From the EC2 Launch Wizard
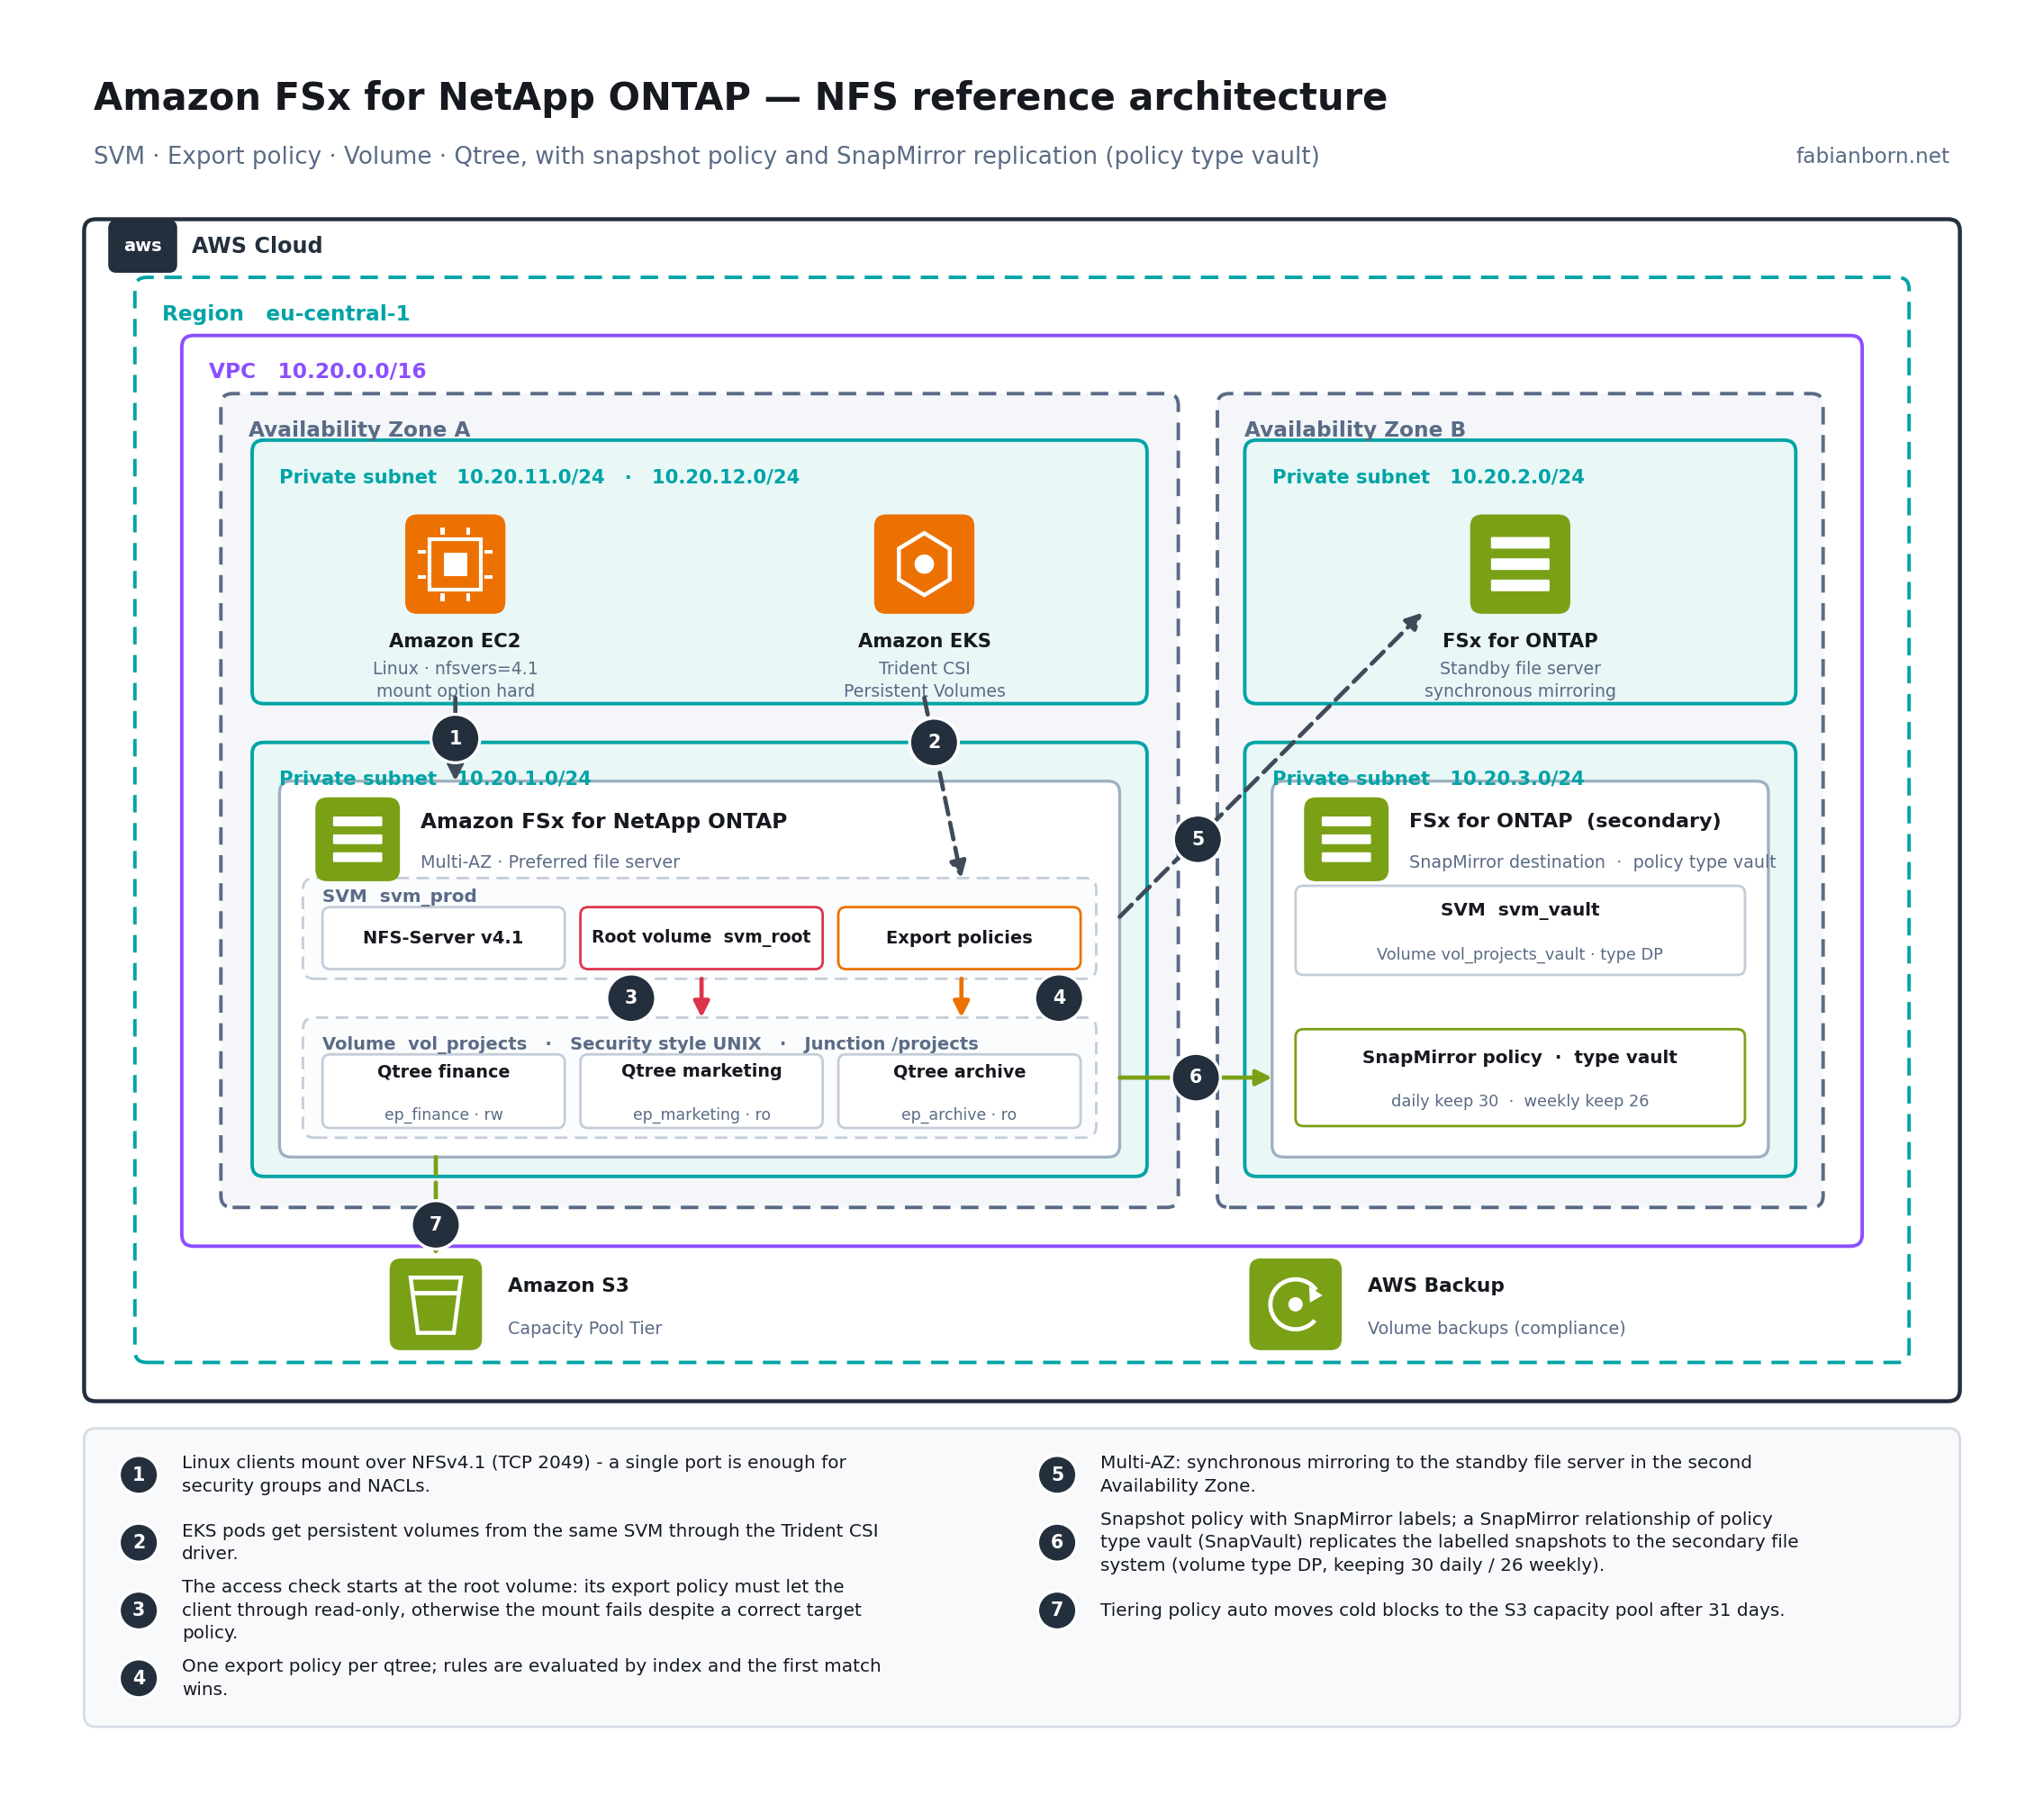
Part 2 of this series went through NFS exports on Amazon FSx for NetApp ONTAP (FSxN) the “proper” way — export policies, namespace inheritance, mount options, all via the ONTAP CLI. That’s the right approach for anything going into production. But if you just want to hand a colleague, a workshop attendee, or your own dev instance an NFS mount without typing a single ONTAP command, the EC2 console can do that for you: the new EC2 launch instance wizard can discover an existing FSxN file system, build the matching security groups, and drop a ready-made mount script into user data — all before you hit “Launch”.
This post walks through that flow, and — more usefully — through what it does not take care of for you.
0. What this feature is, and isn’t
Since 2022, the EC2 console’s launch instance wizard has a File systems section that can attach an FSx file system at launch time. It works for Amazon FSx for NetApp ONTAP. It does not work for FSx for Windows File Server or FSx for Lustre — those still need a manual mount after boot. And it only exists in the new launch instance wizard; the legacy wizard has no such section.
Prerequisite on the FSxN side: an SVM with an NFS-enabled volume and a junction path already exists (see part 2, section 1). The wizard mounts an existing volume — it doesn’t create one for you, whatever the “create a new file system” option in the docs implies for a from-scratch setup.
1. Launching with a shared file system
- Open the EC2 console and choose Launch instance.
- Pick your AMI and instance type as usual.
- Under Network settings, choose Edit and select the file system’s preferred subnet as the instance subnet. This matters more than it sounds — placing the instance in a different AZ than the file system’s preferred subnet works, but adds a cross-AZ hop to every NFS request.
- In the Storage section, expand File systems, select FSx, then Add shared file system.
- Under File system, pick the FSxN file system to mount. The dropdown lists every FSxN file system in the account, in the selected Region — including ones you have no business touching, so double-check you’re picking the right SVM.
Once the file system, SVM, and volume are selected, the wizard fills in the mount point and shows the two automation checkboxes:
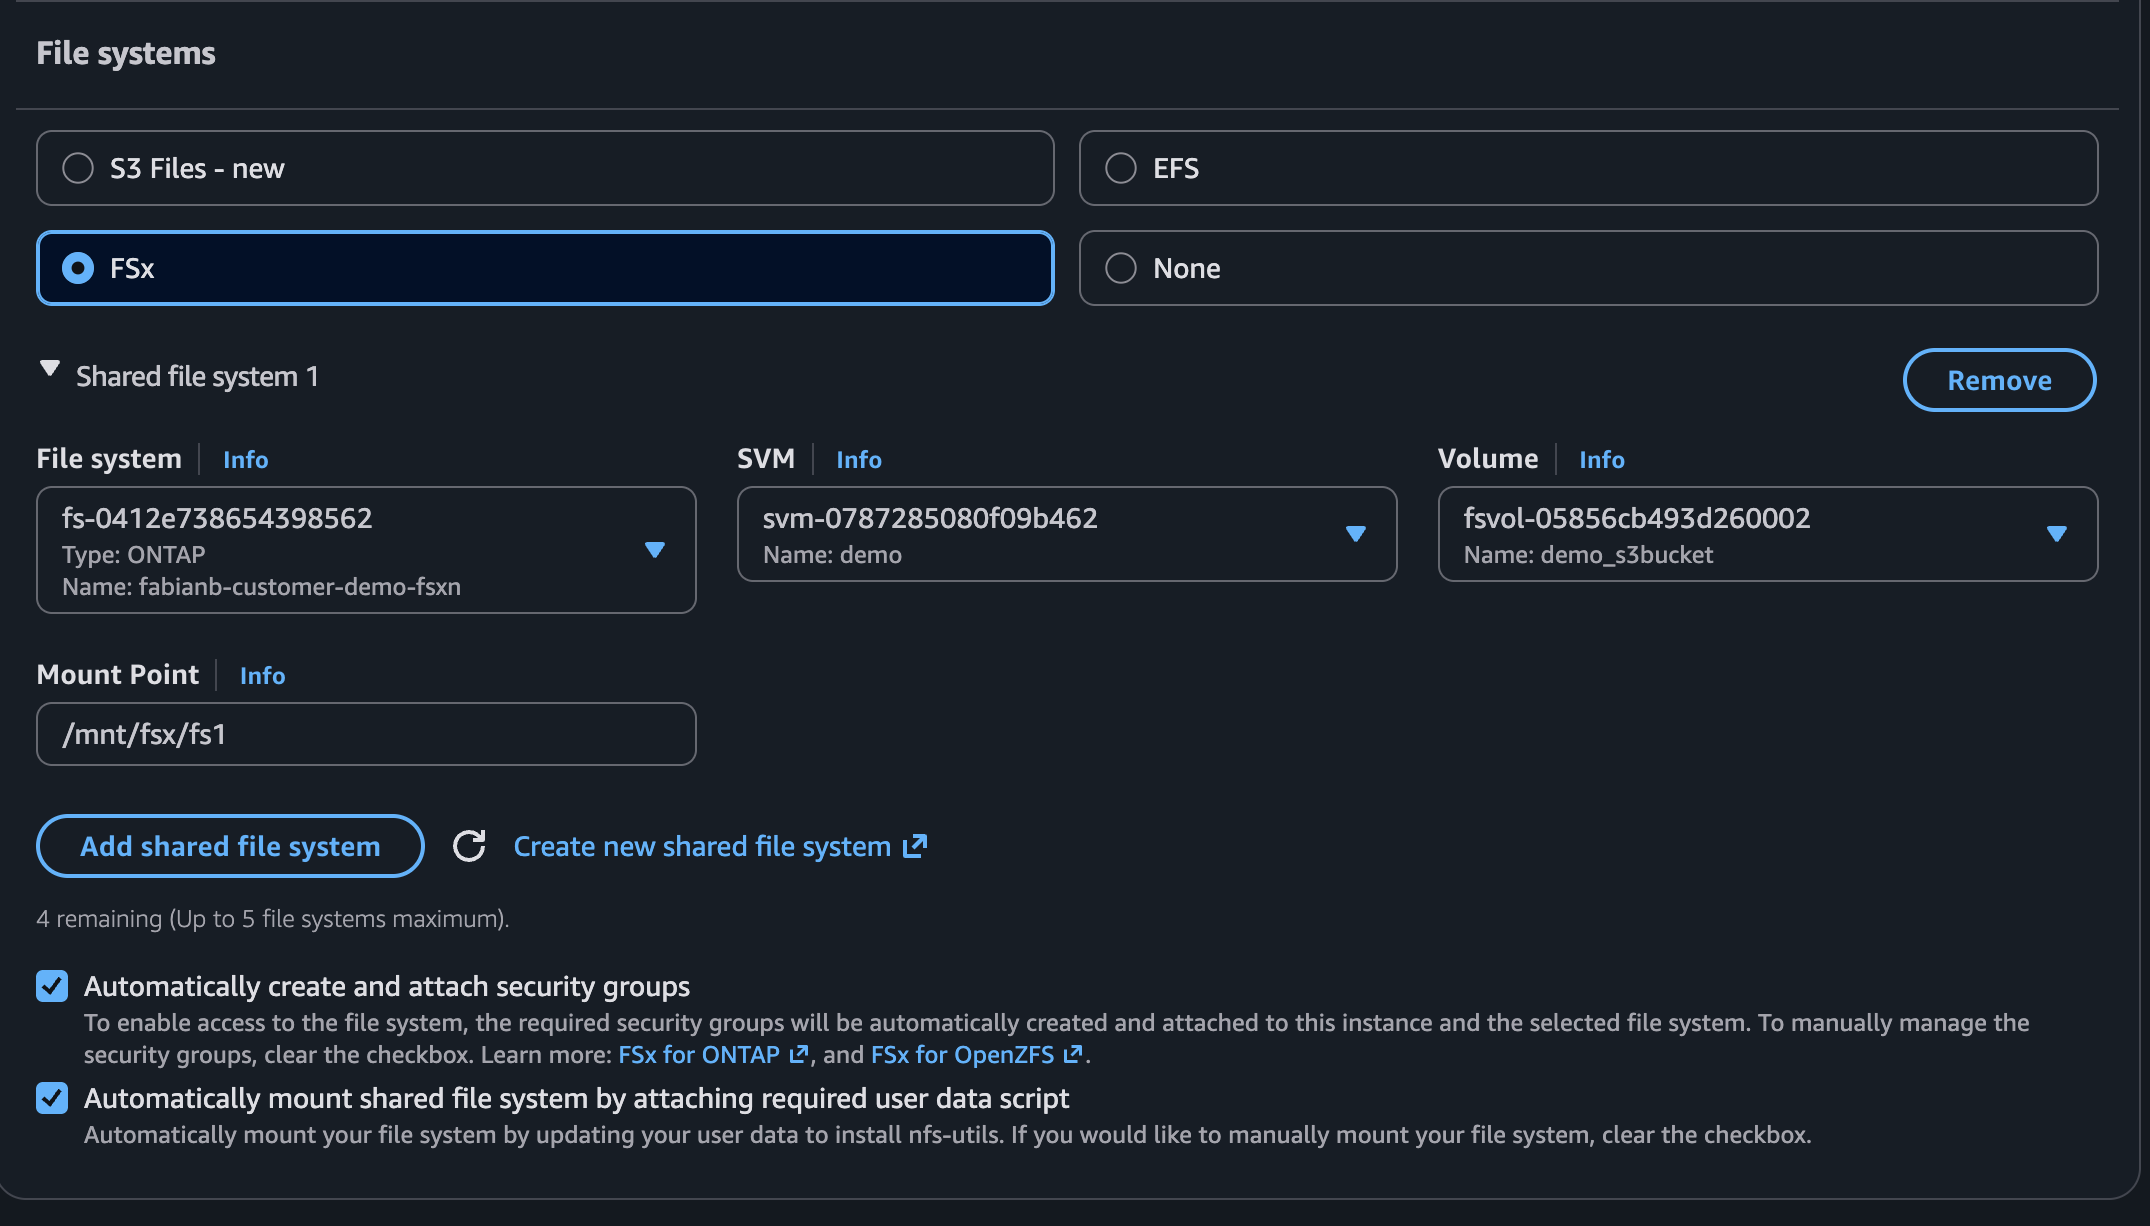
Two checkboxes decide how much the wizard does for you:
- Automatically create and attach security groups
- Automatically mount shared file system by attaching required user data script
Leave both checked for the fast path. Uncheck them if you already manage security groups and bootstrap scripts through your own IaC and just want the wizard to record which file system belongs to which instance.
2. What “automatic security groups” actually creates
With the checkbox enabled, the wizard creates two security groups — one for the instance, one for the file system — and wires them together. The instance-side group gets outbound rules only:
| Protocol | Port(s) | Destination |
|---|---|---|
| TCP/UDP | 111 | file system SG |
| TCP/UDP | 2049 | file system SG |
| TCP/UDP | 635 | file system SG |
| TCP/UDP | 4045–4046 | file system SG |
| TCP/UDP | 4049 | file system SG |
| TCP/UDP | 20001–20003 | file system SG |
The file system-side group mirrors that as inbound rules from the instance SG, plus an unrestricted outbound All/All to 0.0.0.0/0.
That port list is wider than the “NFSv4.1 needs only 2049” story from part 2 — it also opens 111/635 (portmapper/mount, for NFSv3 fallback) and the ONTAP-specific replication/management ports in the 4045–4049 and 20001–20003 ranges. Reasonable as a generated default; worth trimming once you know the instance only ever speaks NFSv4.1, especially since the file system SG’s outbound rule is wide open by default.
3. What “automatic user data” actually runs
The generated user data is a cloud-config script along these lines (values substituted per instance):
#cloud-config
package_update: true
package_upgrade: true
runcmd:
- yum install -y nfs-utils
- apt-get -y install nfs-common
- svm_id_1=svm-0123456789abcdef0
- file_system_id_1=fs-0123456789abcdef0
- vol_path_1=/vol1
- fsx_mount_point_1=/mnt/fsx/fs1
- mkdir -p "${fsx_mount_point_1}"
- printf "\n${svm_id_1}.${file_system_id_1}.fsx.eu-central-1.amazonaws.com:/${vol_path_1} ${fsx_mount_point_1} nfs4 nfsvers=4.1,rsize=1048576,wsize=1048576,hard,timeo=600,retrans=2,noresvport,_netdev 0 0\n" >> /etc/fstab
- retryCnt=15; waitTime=30; while true; do mount -a -t nfs4 defaults; if [ $? = 0 ] || [ $retryCnt -lt 1 ]; then echo File system mounted successfully; break; fi; echo File system not available, retrying to mount.; ((retryCnt--)); sleep $waitTime; done;
A few things worth calling out for anyone who read part 2:
- It targets NFSv4.1 with
rsize/wsizeof 1 MiB andhard,timeo=600,retrans=2— the same conservative, failover-safe options recommended there, just with larger I/O sizes. - It adds
noresvport, which the manual mount command in part 2 didn’t. That flag lets the client rebind to a new source port after a reconnect — useful precisely during an FSxN storage failover, when the client has to re-establish its TCP session. Worth adding to hand-writtenfstabentries too. - It retries the mount for up to 15 × 30 seconds. On first boot the file system is normally already available, so this mostly protects against ordering races when the file system and instance are created in the same automation run.
- The volume path (
vol_path_1) is a flat path like/vol1— a junction path, not a qtree. If your data actually lives under a qtree (/vol1/finance, say), you’ll need to edit the generated user data before launch, or amend/etc/fstabafter boot.
4. What the wizard does not check
This is the part that bites people coming from a klick-ops mindset: the wizard has no idea whether the client can actually reach the volume. It builds the network path (security groups) and the client-side mount config, but the FSxN-side authorization — the export policy — is completely untouched.
Concretely, two failure modes from part 2 still apply here, wizard or not:
- Namespace inheritance. If the SVM’s root volume export policy doesn’t let the instance’s CIDR through read-only, the mount fails with
Permission deniedregardless of how correct everything else is. - Rule ordering and scope. If the target volume’s export policy doesn’t include the instance’s subnet — or an earlier, broader rule shadows the one you’d expect to match — the mount fails the same way.
When a wizard-launched instance can’t mount, the fastest diagnosis is still the tool from part 2:
FsxId0123456789abcdef0::> vserver export-policy check-access -vserver svm_prod \
    -volume vol_app -client-ip 10.20.11.15 \
    -authentication-method sys -protocol nfs4 -access-type read-write
If that comes back denied at the root, the security groups were never the problem.
5. Console convenience vs. production practice
| Launch wizard | CLI (part 2) | |
|---|---|---|
| Setup time | Minutes, no ONTAP knowledge needed | Requires export policy / volume knowledge |
| Security groups | Broad, generated defaults | Scoped by hand |
| Export policy | Not touched — must already be correct | Explicit, reviewed step |
| Mount options | Fixed template (noresvport included) |
Chosen deliberately per workload |
| Qtree-level paths | Manual edit required | Native |
| Repeatability | Per-instance, console-driven | Scriptable, fits IaC |
Good fit for the wizard: a quick dev/test box, a training environment, a one-off instance where you’d otherwise hand-type the same mount command from part 2 anyway. For anything that ends up in a launch template, an ASG, or Terraform/CloudFormation, treat the generated user data and security groups as a first draft — copy the pattern into your IaC, tighten the security group to the ports the instance actually needs, and keep the export policy work from part 2 as the real access control.
6. Scripting the same flow with Terraform
Two providers: hashicorp/aws for the AWS side, NetApp/netapp-ontap for the export policy the wizard leaves untouched (section 4).
# --- AWS side: volume, security groups, instance --------------------------

resource "aws_fsx_ontap_volume" "vol_app" {
  name                       = "vol_app"
  storage_virtual_machine_id = aws_fsx_ontap_storage_virtual_machine.svm_prod.id
  junction_path              = "/app"
  security_style             = "UNIX"
  size_in_megabytes          = 1048576

  tiering_policy {
    name = "AUTO"
  }
}

resource "aws_security_group" "instance_sg" {
  name   = "ec2-fsxn-nfs-client"
  vpc_id = var.vpc_id

  egress {
    from_port       = 2049
    to_port         = 2049
    protocol        = "tcp"
    security_groups = [aws_security_group.fsxn_sg.id]
  }
  # mirror the remaining ports from section 2 (111, 635, 4045-4046, 4049, 20001-20003) as needed
}

resource "aws_security_group" "fsxn_sg" {
  name   = "fsxn-nfs-server"
  vpc_id = var.vpc_id

  ingress {
    from_port       = 2049
    to_port         = 2049
    protocol        = "tcp"
    security_groups = [aws_security_group.instance_sg.id]
  }
}

resource "aws_instance" "app" {
  ami                    = var.ami_id
  instance_type          = "m6i.large"
  subnet_id              = var.subnet_id
  vpc_security_group_ids = [aws_security_group.instance_sg.id]

  # same #cloud-config from section 3, parameterized instead of hardcoded
  user_data = templatefile("${path.module}/fsxn-mount.cloud-config.tftpl", {
    svm_dns_name = aws_fsx_ontap_storage_virtual_machine.svm_prod.endpoints[0].nfs[0].dns_name
    volume_path  = aws_fsx_ontap_volume.vol_app.junction_path
    mount_point  = "/mnt/fsx/app"
  })
}

# --- ONTAP side: the export policy rule the wizard skips -------------------

provider "netapp-ontap" {
  connection_profiles = [{
    name           = "svm_prod"
    hostname       = aws_fsx_ontap_storage_virtual_machine.svm_prod.endpoints[0].management[0].dns_name
    username       = "fsxadmin"
    password       = data.aws_secretsmanager_secret_version.svm_admin.secret_string # never hardcode this
    validate_certs = false
  }]
}

resource "netapp-ontap_nfs_export_policy_rule" "app_tier" {
  cx_profile_name    = "svm_prod"
  svm_name           = "svm_prod"
  export_policy_name = "ep_app_tier"
  clients_match      = ["10.20.11.0/24"]
  ro_rule            = ["sys"]
  rw_rule            = ["sys"]
  protocols          = ["nfs4"]
  superuser          = ["none"]
}
Two things worth flagging:
- Don’t hardcode
svm_admin_password. Terraform would keep it in plain text in state. Pull it from Secrets Manager instead (data.aws_secretsmanager_secret_version, as above) — AWS even publishes a reference solution for rotating that password automatically, which pairs well with a Terraform-managed file system. - This is also the way to encode the namespace-inheritance rule from part 2 (root volume policy readable, nothing else) as code, alongside the workload-specific rule — a
netapp-ontap_nfs_export_policy_ruleresource for the SVM’sdefaultpolicy, applied once, reused by every volume.
The net effect: the console wizard and this Terraform pair produce the same running state — same security groups, same mount options, same export policy — but only the Terraform version has the export policy under version control next to the network plumbing, instead of living as a one-off vserver export-policy command someone ran by hand.
Conclusion
The EC2 launch wizard’s FSx integration is a genuinely convenient shortcut — it saves the fstab boilerplate and gets the mount options right by default. But it operates purely on the AWS side of the fence: security groups and client configuration. The ONTAP-side authorization model from part 2 — namespace inheritance, export policy rule order — still governs whether the mount actually succeeds, and the wizard won’t tell you when it doesn’t. Terraform, run with the netapp-ontap provider alongside hashicorp/aws, is the way to close that gap for good instead of re-discovering it on every new instance.
Sources: Use Amazon FSx with Amazon EC2 instances, Amazon FSx file system EC2 launch experience.